How to Style a Wolf Cut: Simple Tricks for Volume and Texture

Getting the styling right is what takes a wolf cut from “interesting haircut” to genuinely great hair. The cut itself gives you the raw material — choppy layers, built-in volume — but ten minutes of know-how is what makes it look intentional instead of accidental. This modern shag-mullet hybrid is built to look undone, but a little technique keeps it from tipping into just plain messy — think full, textured, and intentional.
It really comes down to two things: lift at the crown and soft definition through the lengths. Get those right and the rest of the cut practically styles itself — get them wrong and even a great haircut can look flat. A lightweight volumizing product, a blow dryer aimed at the roots, and a few loose bends through the ends will do most of the work for you.
Straight, wavy, or curly — working with your natural texture makes everything easier and the result looks better for it. You don’t need a drawer full of tools here; a few smart product choices and the right drying technique keep the cut full, defined, andlooking currentday after day.
Between salon visits, regular trims and a light hand with product keep the shape honest. Done right, it’s bold yetlow-effort — the kind of cut that works with jeans as well as it does dressed up. New to the wolf cut itself? Read the beginner’s guide to what it is first, then come back for the styling.
So, What Exactly Is a Wolf Cut?
A wolf cut is a heavily layered haircut that mashes up the shag and the mullet. Short, choppy layers around the crown build volume and texture, while the lengths stay softer and a little longer toward the bottom. The result feels lived-in and slightly edgy — full on top, more tapered through the ends.
Movement is the whole point. Instead of smooth, even layers, it uses uneven, feathered texture to create lift and shape, with a deliberately fuller crown. That’s where the signature “messy, but on purpose” finish comes from.
It works on straight, wavy, and curly hair alike, because the layering amplifies whatever texture you already have instead of fighting it.

Why It’s Such an Easy Cut to Live With
The wolf cut stays popular for one very good reason: the haircut does most of the styling for you. That’s a big part of its appeal — it was designed for people who want to look styled without actually styling much. No perfect blowouts required, no heavy heat routine — the shape is already there.
- Layers that style themselves: the choppy, stacked layers create shape on their own, so even air-dried hair has movement and definition.
- Volume where it counts: shorter crown layers lift naturally, so you’re not teasing or piling on root booster every morning.
- Made for your texture: straight, wavy, or curly, the cut works with your natural pattern instead of against it.
The Tools Worth Having
Nothing fancy required — but the right basics make a real difference. If you already own a blow dryer and one texturizing product, you’re most of the way there. Since this cut is all about crown volume and separated layers, choose tools that create lift and texture, not glassy smoothness.
Blow Dryer + Diffuser
If your hair is wavy or curly, a diffuser is non-negotiable. Drying curly hair without one is like styling with one hand tied — technically possible, unnecessarily hard. It spreads the airflow so frizz stays down and your natural texture gets enhanced rather than blasted apart.
Flip your head upside down or lift sections at the roots while diffusing — it builds shape fast without over-styling, keeping the cut full instead of flat.

Round Brush or Vent Brush
For straight or slightly wavy hair, either brush helps lift the roots. Blow-dry the crown upward, pulling sections slightly forward — that’s where the wolf cut needs its volume.
This stops the top layers from collapsing and keeps the silhouette balanced. A vent brush dries faster; a round brush gives more controlled, deliberate lift. Pick your priority — or keep both, since they’re inexpensive and cover different mornings.

Curling Iron or Flat Iron
A few loose waves bring out the layered texture without looking “done.” A medium-barrel iron makes soft bends; a flat iron can press in subtle S-waves. Skip tight curls — you want separation and movement that help the short crown layers melt into the longer ends.

Texturizing + Volumizing Products
Lightweight texturizing spray or volumizing mousse — these define the choppy layers without the crunch. Heavy creams are the enemy here; they flatten everything the haircut is trying to do. When in doubt, use less than you think you need — you can always add more, but you can’t easily take it back. Scrunch a little into the ends or work it through the roots for fullness that still moves.

How to Style a Wolf Cut, Step by Step
Four steps, no guesswork: prep for texture, build crown volume, define the ends, then finish with separation. Run through it twice and it’ll become muscle memory — most people get the whole routine down to ten minutes. Here’s exactly how to put it together at home.

Step 1 – Prep with Texture
Start with damp hair — not dripping, just damp. Too wet and the product dilutes; too dry and it won’t distribute evenly. Towel-dried is the sweet spot. Work a lightweight volumizing mousse or texturizing spray through the roots and mid-lengths. Heavy creams will flatten the layers, so keep it light.
Distribute with your fingers and scrunch gently if you have natural wave. This base gives the hair grip, so the shorter crown layers actually hold their shape once dry.
Step 2 – Build Volume at the Crown
The crown makes or breaks a wolf cut. Tip your head slightly forward, or lift sections straight up, while blow-drying — round brush or diffuser depending on your texture — with the airflow aimed at the roots.
Concentrate on those shorter top layers to build height. Resist the urge to smooth everything down; soft lift is the goal, not sleek flatness. If your crown still looks flat after drying, a quick blast of cool air while the section is lifted often does the trick.
Step 3 – Define the Ends
With the crown full, move down. Use a medium-barrel iron or flat iron for soft bends — not curls. Wrap small sections loosely, alternating directions so it looks natural rather than uniform.
Leave the very tips fairly straight for that feathered, edgy finish — curling all the way to the ends is what turns a wolf cut into a pageant look, and that’s not the assignment. This blends the layers without erasing their texture.
Step 4 – Finish with Separation
Last step: a light mist of texturizing spray or a touch of dry wax, then fingers — not a brush — to separate the crown layers and tousle the ends. Brushing undoes everything; finger-styling keeps it effortless. You’re after slightly messy, full on top, textured throughout. Step back from the mirror when you think you’re done — wolf cuts look best judged from a normal distance, not six inches away.
Styling by Hair Type
Same haircut, slightly different playbook depending on your texture. The fundamentals don’t change — crown lift, light product — but the details shift, so here’s how to adjust.
Straight Hair

Straight hair can let the layers fall flat, so your job is manufacturing movement. Mousse at the roots, then blow-dry with a round brush lifting the crown upward.
Add soft bends with a medium-barrel iron to wake up the choppy layers, and finish with texturizing spray so it doesn’t read too sleek or heavy.
Worth knowing: Aim heat upward at the crown, not down along the hair. That one directional change keeps the top layers full instead of pressed flat — small habit, big difference.
Wavy Hair

Wavy hair and wolf cuts are a natural match — the texture does half the work. Apply a curl cream or light mousse to damp hair and scrunch.
Diffuse while lifting at the roots for volume, then hands off: finger-separate the layers instead of brushing to keep definition and that shaggy ease.
Worth knowing: Let your hair air-dry about 20% before diffusing. It cuts frizz and lets the waves form more naturally than going straight in with heat.
Curly Hair
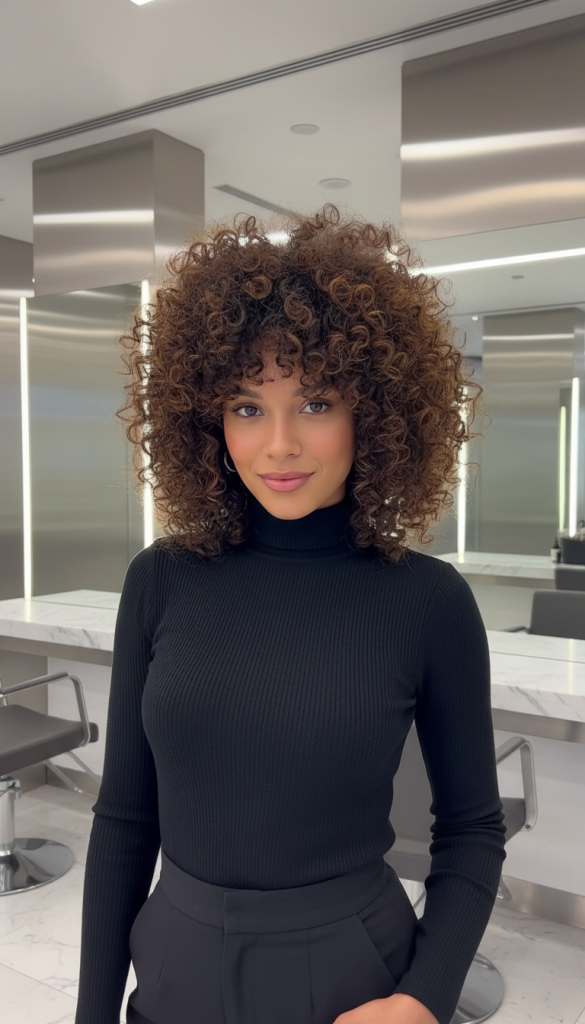
Curls give a wolf cut serious personality and volume. Work in a curl-defining cream, then diffuse upside down to max out crown lift.
Let the shorter top layers expand freely while keeping the ends shaped. A light-hold spray tames frizz without killing the bounce. Strong-hold hairspray on curls tends to create that crunchy helmet effect, which fights the whole undone brief.
Worth knowing: Keep product concentrated on the mid-lengths and ends. Too much at the roots weighs the crown down and steals the cut’s signature volume.
Keeping the Cut in Shape
- Trim every 6–8 weeks: regular trims keep the layers sharp — wait too long and the shag goes bulky and loses its edge.
- Fight flat crowns: a root-lifting spray, or just flipping your part now and then, keeps height where the cut needs it.
- Stay lightweight: texturizing spray, mousse, dry shampoo — yes. Heavy creams and oils — they’ll flatten the airy texture you’re paying for.
- Refresh, don’t restart: a quick blast of the blow dryer at the roots revives day-two volume without a full restyle. Dry shampoo at the crown the night before also helps — it absorbs oil while you sleep so you wake up closer to finished.
- Condition strategically: keep conditioner on the mid-lengths and ends. Buildup at the roots drags the layers flat and kills the volume.
Mistakes That Ruin a Good Wolf Cut
- Heavy products: thick creams and oils suffocate the layers and destroy the airy texture.
- Flat crown: skip the root lift and the whole cut reads limp instead of bold.
- Over-curled ends: tight curls bury the choppy layers. Loose, broken texture is the look.
- Skipped trims: wait too long and the layers grow into each other, losing all definition.
- Over-straightening: iron it glassy-smooth and you’ve erased the shaggy, undone character that makes it a wolf cut.
Wolf Cut Styling FAQs
Final Thoughts
A wolf cut runs on confidence, texture, and movement. Styled and maintained with a light hand, it’s one of the most versatile layered cuts you can wear — and the goal was never perfection. Volume at the crown, light defined layers, and the nerve to leave it a little undone.
Whatever your texture, tuning the routine to match it makes the biggest difference. Regular trims, lightweight products, and a willingness to embrace the mess: that’s the whole formula for keeping it modern and full of personality. Stop chasing perfection with this cut — its charm is in the controlled chaos.