23 Pink Eye Makeup Looks You’ll Want To Save Right Now
Pink eye makeup has a range that most colours never get credit for. It can sit soft and sheer for daytime, then turn sharp, glossy or neon bright the moment you change the finish. This roundup pulls together 23 pink eye makeup looks that readers save again and again, from a gentle halo of shimmer to a full fuchsia lid that stops a scroll mid swipe.
Each look below comes with a close look at what is actually happening on the eye. You will see where the colour sits, how the edges are finished, and which small choices keep the pink reading clean instead of messy. Inside the set you will find watercolour washes, graphic floating lines, glitter cut creases, chrome lids and dotted details, plus softer mauve and dusty rose options for days when bright pink feels like too much. Keep a few favourites in mind as you go, because the final looks build toward the boldest pink statements of the whole collection.
1. The Save Worthy Signature Pink Look

Shot in profile, this look pairs a hot pink shadow swept high toward the brow with a crisp black wing and a pink blazer that doubles the colour story. The shadow keeps a satin finish, strong at the outer corner and softer as it climbs, while the skin carries a bright highlight on the cheekbone and a glossy nude pink lip.
What makes it signature worthy is the commitment. The pink is not an accent here, it is the whole outfit plan, matched top to lid. To wear a version of it, keep the rest of the face polished and simple, let one pink lead, and echo it once in clothing or nails rather than adding a second bright colour.
One strong pink, worn on the eyes and echoed in the outfit, reads as a deliberate style choice rather than a makeup accident.
2. Soft Pink Halo Eye

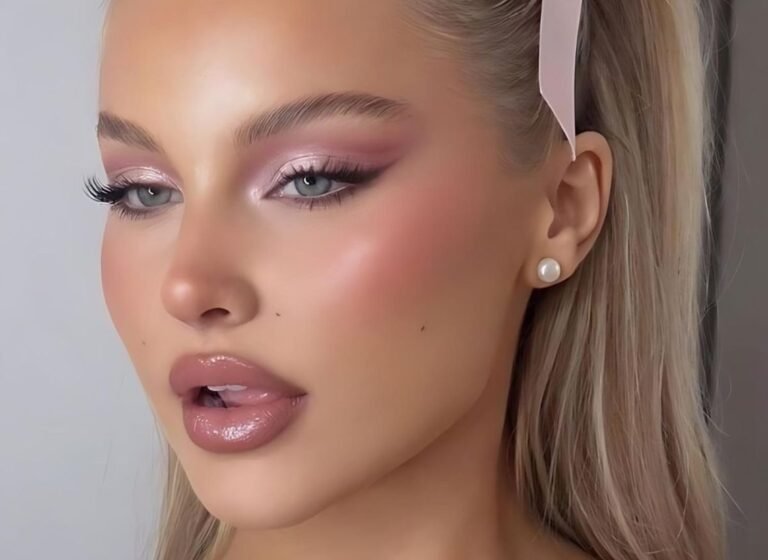
A halo eye places deeper colour at the inner and outer corners and leaves the centre of the lid bright, and here that centre is a pale shimmering pink that catches light every time the eye moves. Soft rose pink frames it on both sides and runs under the lower lashes too, so the whole eye looks ringed in pink.
The lashes stay feathery and separated, which keeps the softness intact. Build it by packing the rose shade at both corners first, then pressing the pale shimmer into the middle with a fingertip. Blend the joins with a clean fluffy brush and stop before the centre loses its glow. The same halo placement also suits smaller lids, since the bright centre opens the eye up.
Pack rose pink at the inner and outer corners of the lid, leaving the centre bare.
Press pale pink shimmer into the centre of the lid with a fingertip for the brightest payoff.
Soften the joins with a clean brush and run the rose shade under the lower lashes.
3. Fuchsia Lid Statement
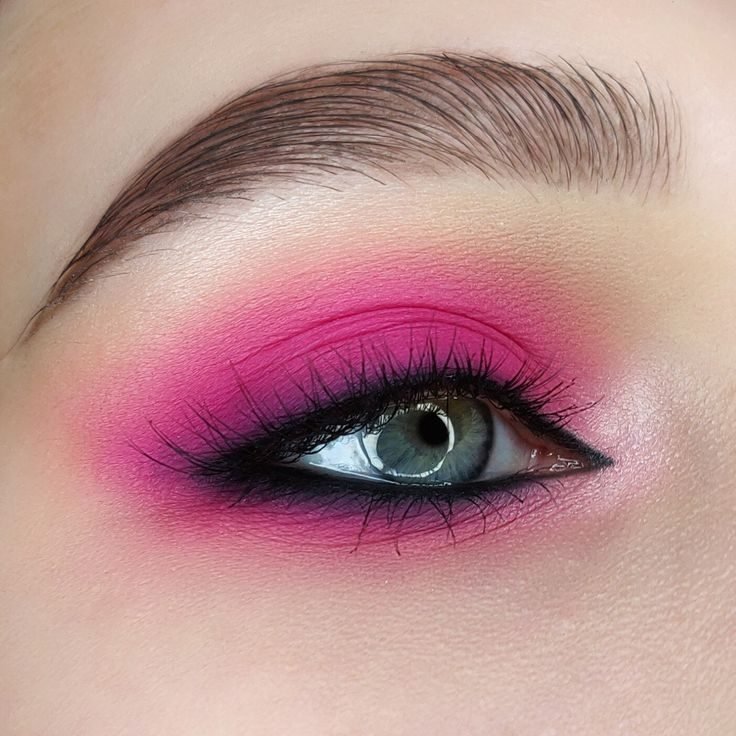
Fuchsia covers the whole lid here and climbs well above the crease, a flat wall of saturated pink with a darker edge smoked along the lash line. Against green eyes the colour looks even louder, because pink and green sit opposite each other and push each other forward.
A lid this bold needs tidy borders. The upper edge is diffused just enough to avoid a hard sticker line, and the lower lash line stays mostly bare so the top lid owns the attention. Keep lips and blush quiet, choose a matte or satin fuchsia, and give the pigment a pale base to grip so it stays true all day. A single coat of mascara is enough here, since the colour already does the heavy lifting.
4. Pink And Gold Duo Chrome
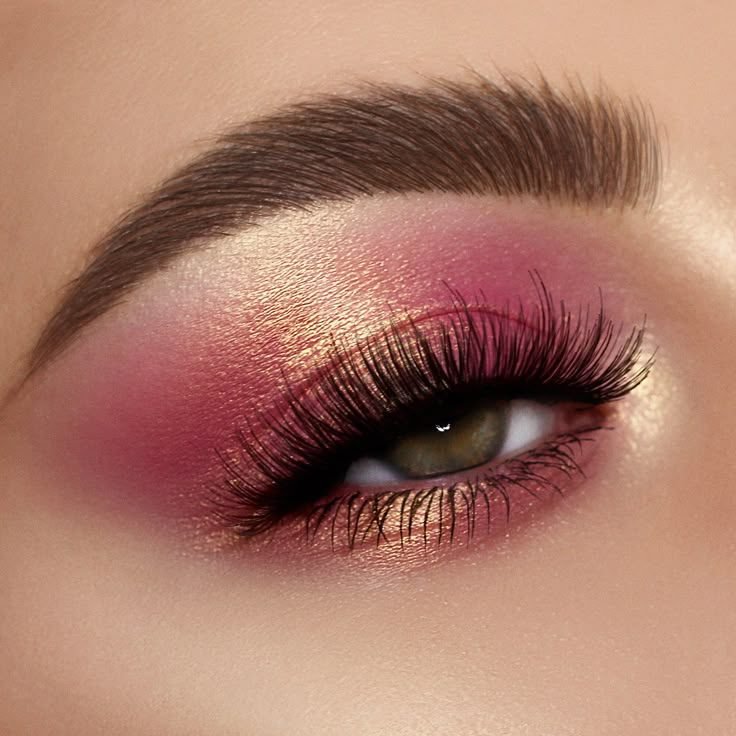
Gold shimmer floods the centre of this lid while deep pink wraps the crease and outer corner, and where the two meet the colour seems to shift as the light changes. That in between zone is the duo chrome effect, warm gold from one angle and rose pink from another.
The blend runs under the eye as well, pink below the lower lashes with a touch of the same gold at the inner corner. Recreate the shift by laying the pink first, then patting the metallic gold only onto the middle of the lid. Patting matters. Sweeping drags the gold everywhere and the two tone contrast disappears. The warmer the gold, the softer the whole look feels against the pink.
💡 Quick Tip
Pat metallic gold onto the centre of the lid with a flat brush or fingertip. Sweeping spreads it too thin and the pink to gold shift gets lost.
5. Blossom Pink Watercolour Wash
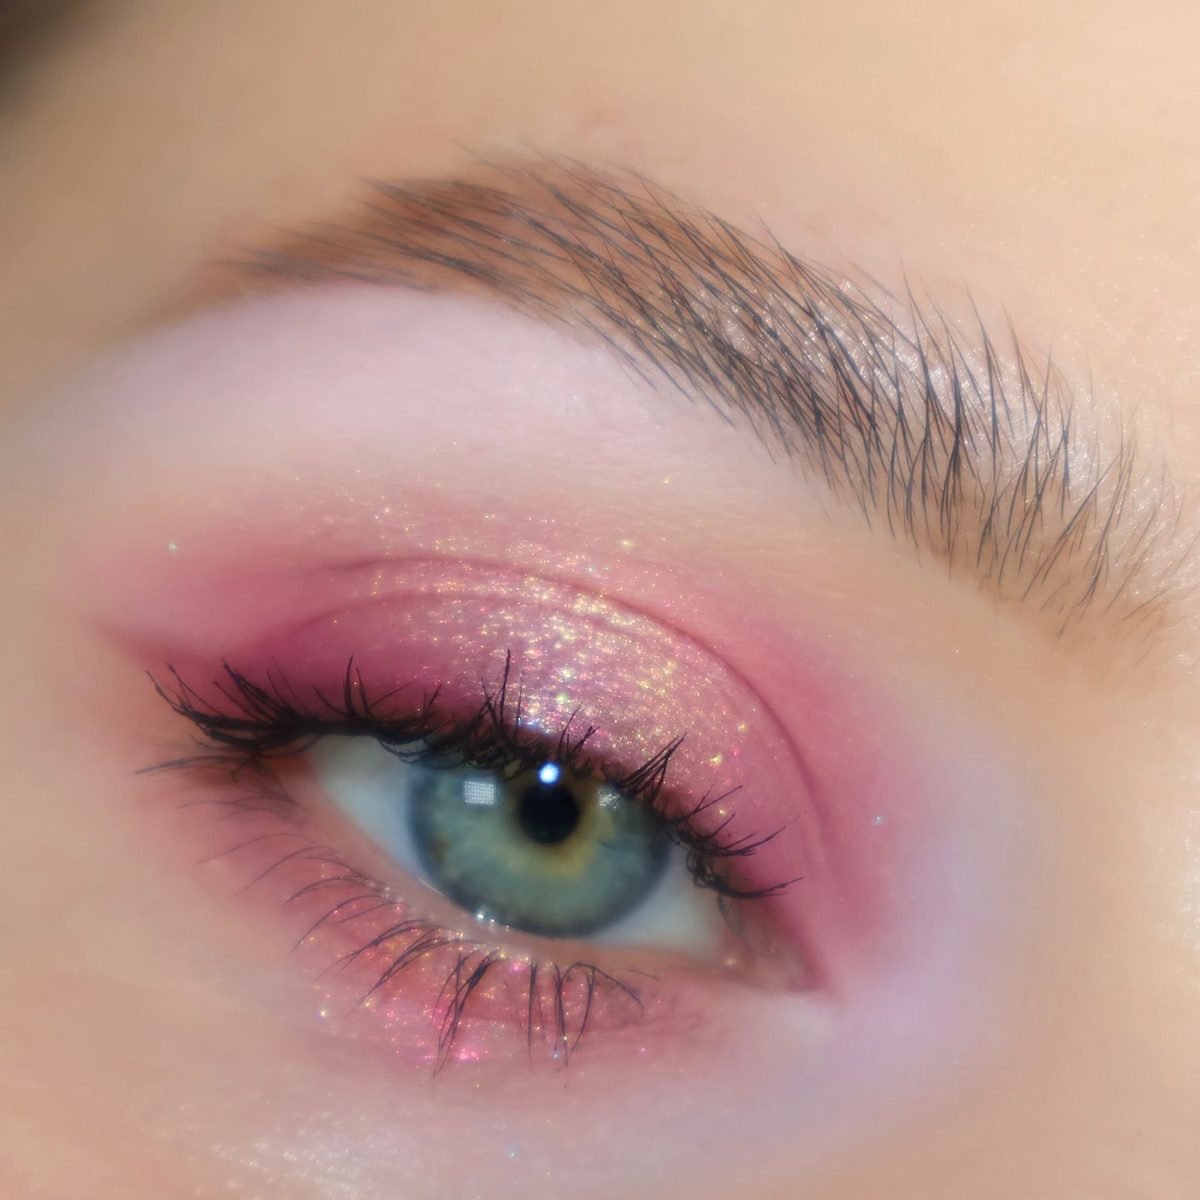
Colour here behaves like paint in water. A sheer blossom pink floats across the lid and fades out at every edge, with fine sparkle suspended through it and a deeper pink whisper at the outer corner. Nothing is outlined, nothing is sharp, and that softness is the whole point.
A wash like this forgives shaky blending because the edges are meant to disappear. Use a big fluffy brush, a low pigment pink, and several light passes instead of one heavy one. The blue green eye underneath keeps the look fresh, and a bare lash line with simple mascara stops the wash from turning into a full glam look. A soft pink lip balm is all the company this wash needs.
6. Pink Graphic Floating Crease

A bubblegum pink shadow fills the lid and flicks into a sharp point at the outer corner, then a clean white line floats above the crease and follows the same angle. A tiny white heart sits at the wing tip, the kind of small detail that gets a look screenshotted and shared.
Graphic work lives or dies on symmetry and clean lines. Sketch the floating line with the eyes open, looking straight ahead, so it sits above the natural crease where people will actually see it. A fine brush and a gel or liquid formula give the steadiest edge, and cotton buds with micellar water fix slips better than layering more product.
Recreate this look
7. Rose Pink Smokey Wing

Instead of rounding off at the outer corner, this rose pink smokey eye keeps going, dragged outward and upward into a wing shape that lifts the whole eye. The deepest pink sits at the outer third, a black liner wing reinforces the angle, and the inner lid stays lighter so the gradient reads clearly.
The shape does the work that heavy contour usually does. To copy it, blend the shadow out past the corner, then clean the lower edge with a cotton bud or a line of concealer to sharpen the lift. Keep the pink smokiness soft at the top edge or the wing starts to look painted on. The blue eye in the photo shows how well rose pink flatters cool toned eyes.
Blend the pink past the outer corner and clean the lower edge for a lifted line.
Keep the deepest colour at the outer third of the lid.
Rounding the shadow off at the corner, which drops the lift the wing creates.
A hard top edge, which makes the shape look stuck on.
8. Pink Glitter Cut Crease

A cut crease draws a hard line where the crease sits, and here that line is traced in silver glitter over a wash of pink, with a black wing finishing the outer corner. The contrast between the matte pink and the sparkling carved line is what makes the eye look sculpted.
Precision is the price of entry. Cut the crease with concealer on a flat brush, set the line with glitter while the base is still tacky, and work with the eye looking down so nothing transfers upward. The pink under the lower lashes balances the drama on top and keeps the look joined up. Photograph it in daylight and the glitter line throws back tiny flashes of light.
- ▸Carve the crease line with concealer before any glitter goes near the eye.
- ▸Press glitter onto the tacky line instead of brushing it, to limit fallout.
- ▸Run a soft pink under the lower lashes so the top half does not float alone.
9. Cotton Candy Pastel Pink
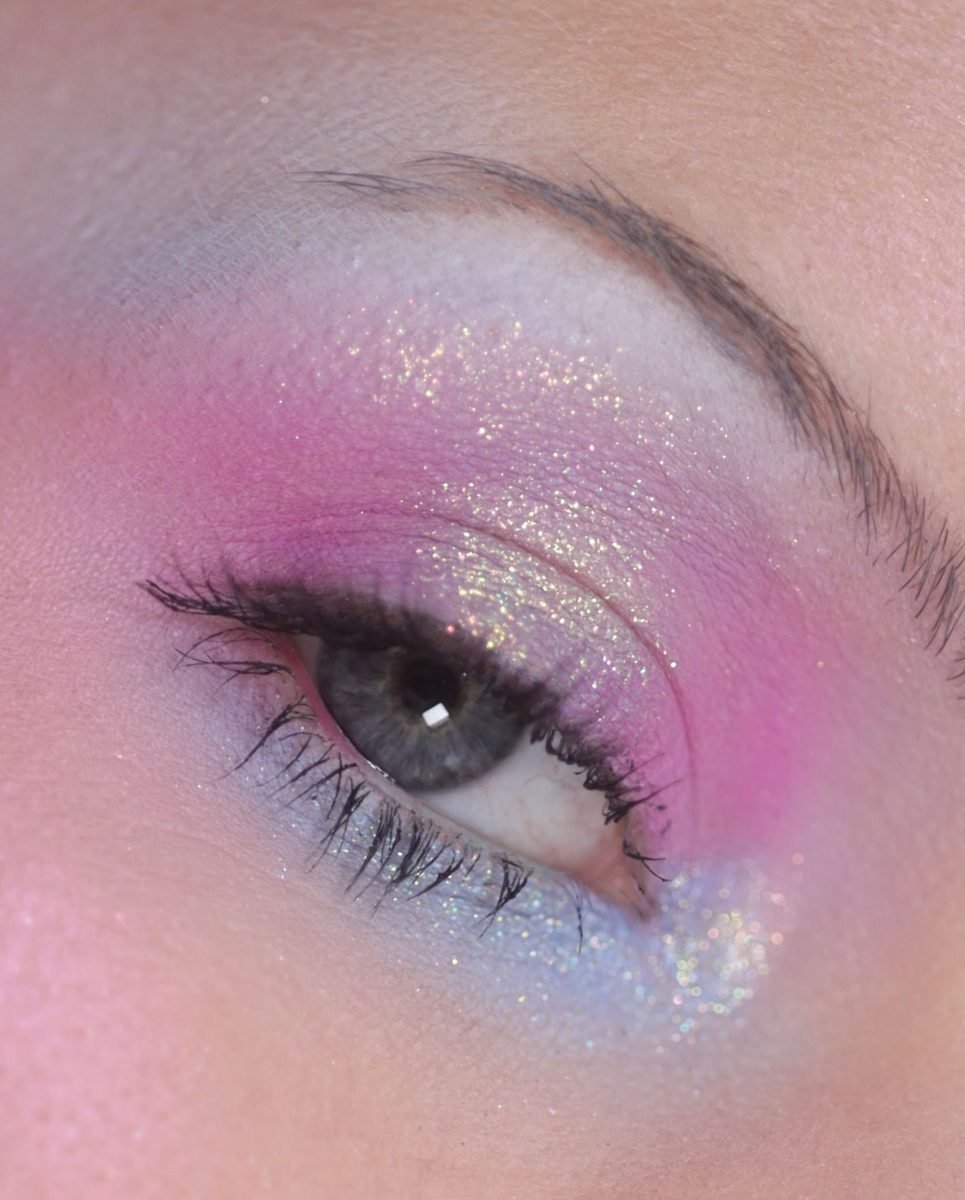
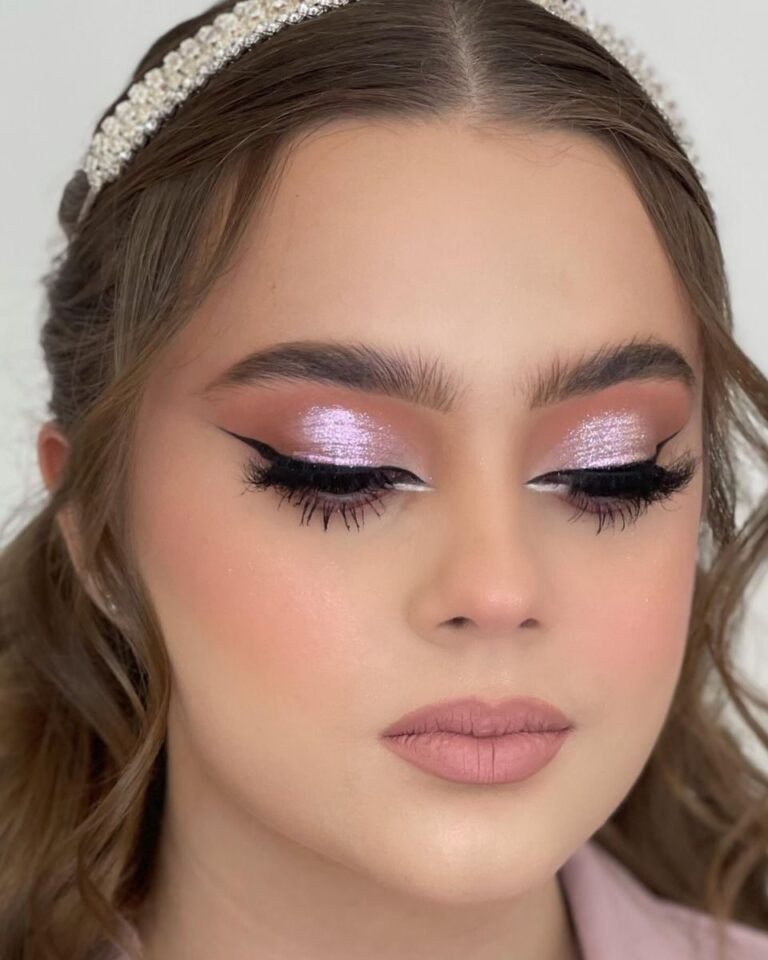
Pastel pink melts into lilac across this lid, dusted with fine iridescent glitter and a hint of pale blue along the lower lash line. The colours stay light and sugary, closer to spun sugar than to paint, and the whole eye feels soft even though the sparkle is generous.
Pastels can vanish on the skin, so the trick is a white or pale base under the shadow to keep the pink reading pink. Keep liner out of the picture or very thin, let the lashes stay wispy, and the cotton candy effect survives. Strong black liner would cut the softness in half. A dusting of the same pastel pink on the cheeks keeps the sweet theme going.
Pastel shadow straight onto bare skin, which turns grey and patchy within the hour.
The same pastels over a pale base, reading true pink and lilac with the glitter sitting on top, like the photo.
10. Magenta And Pink Ombre
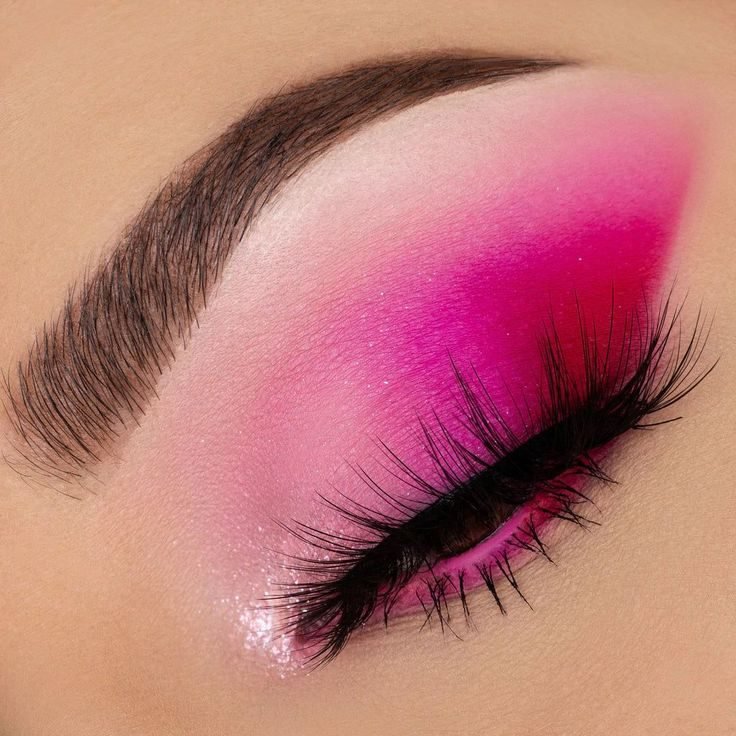
With the eye closed, the gradient does all the talking. Pale pink at the inner corner deepens step by step into rich magenta at the outer edge, with no visible stripes where one shade hands over to the next. Long lashes and a fine dark line at the base anchor the colour.
Ombre work is really blending work. Lay the lightest pink first, the magenta last, then use a mid pink on a clean brush to blur the meeting point in small circles. Working light to dark keeps the pale end clean. Going the other way drags magenta everywhere and the gradient turns muddy. Check the blend in natural light before you finish, since stripes hide indoors.
| Inner corner | Outer corner |
|---|---|
| Pale pink, kept clean and bright | Deep magenta, the darkest point of the look |
| Applied first, with its own brush | Applied last, blended back with a mid pink |
11. Pink Foil Lid
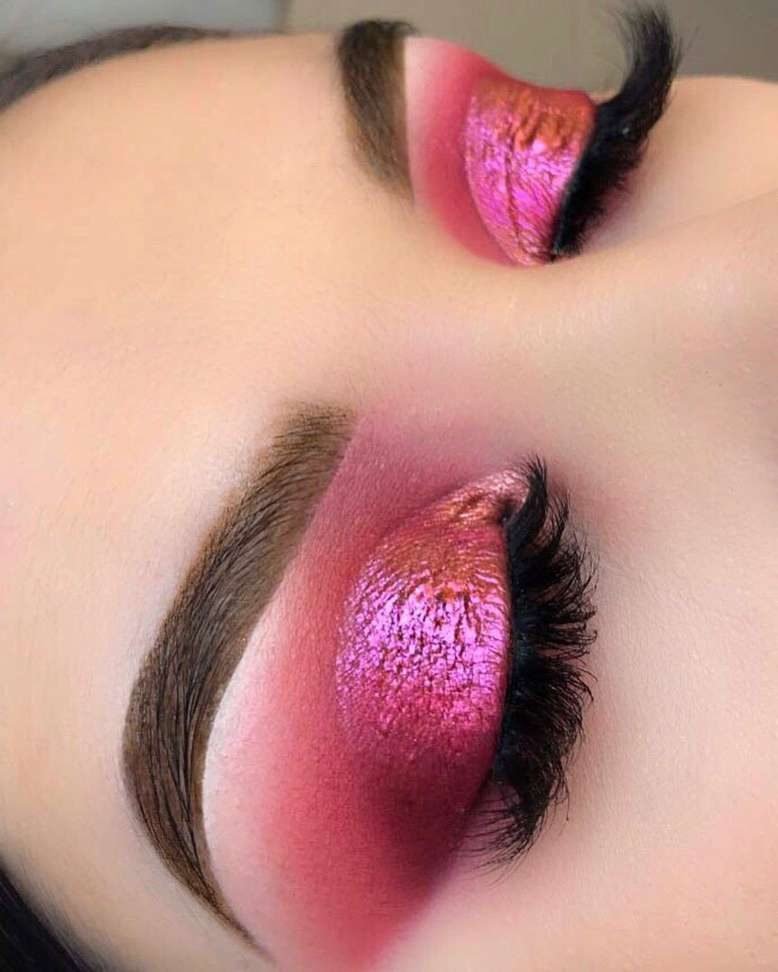
Foil shadow goes on like liquid metal, and this lid shows the full effect: a molten pink with a purple shift, smooth and reflective from lash line to crease, framed by a deeper pink at the edges. It catches light the way a satin dress does, in one unbroken sheet.
That mirror finish comes from application, not luck. Foil pigments need a sticky base or a damp brush, pressed on in layers rather than swept. Keep the crease colour matte so the foil has something to contrast with, and skip extra shimmer elsewhere on the face. One reflective surface per look is plenty. The sideways angle in the photo shows the foil shifting between pink and violet as it turns.
12. Dusty Rose Vintage Pink
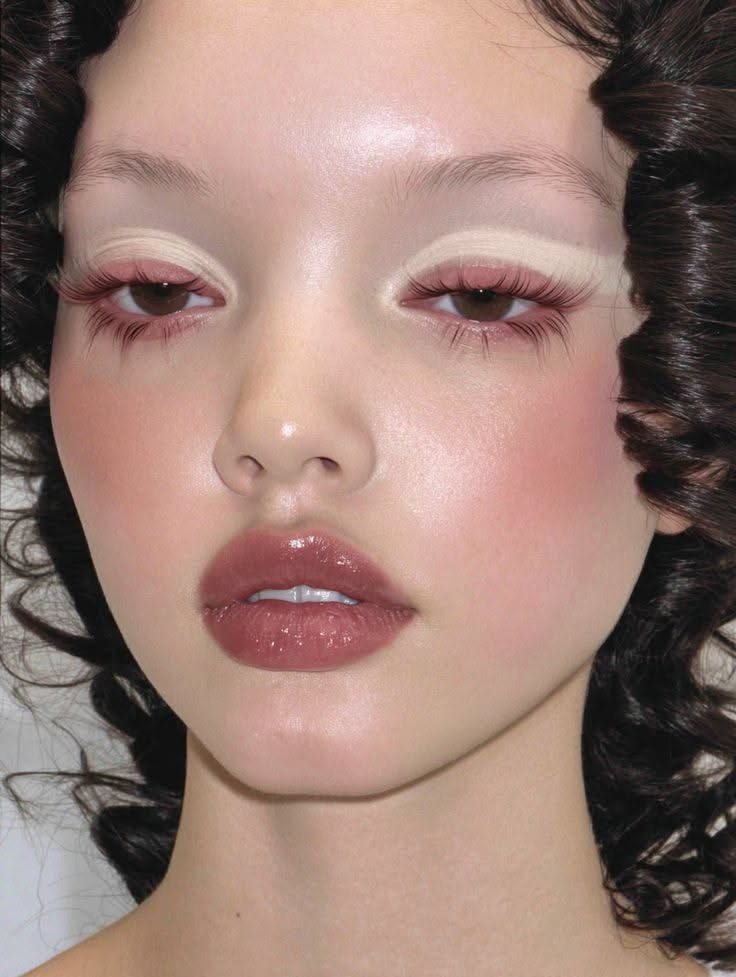
Everything in this portrait leans vintage. Finger wave curls frame a face where dusty rose blush drapes high across the cheeks and the lids carry a muted, greyed pink with a pale liner arc above the crease. The lips finish the story in a deep rose with a satin sheen.
Dusty rose is pink with the brightness turned down, and that restraint is why it suits the retro mood. Keep the skin luminous rather than matte, let the blush and eyeshadow share the same muted family, and avoid any neon or icy accents. The look whispers where the fuchsia entries shout, and both have their place. The hairstyle matters here too, since the waves sell the vintage mood as much as the makeup does.
📌 Good To Know
Dusty rose shades carry a grey or brown undertone. If a pink looks muted and slightly faded in the pan, it belongs to this family.
13. Pink With White Liner Contrast
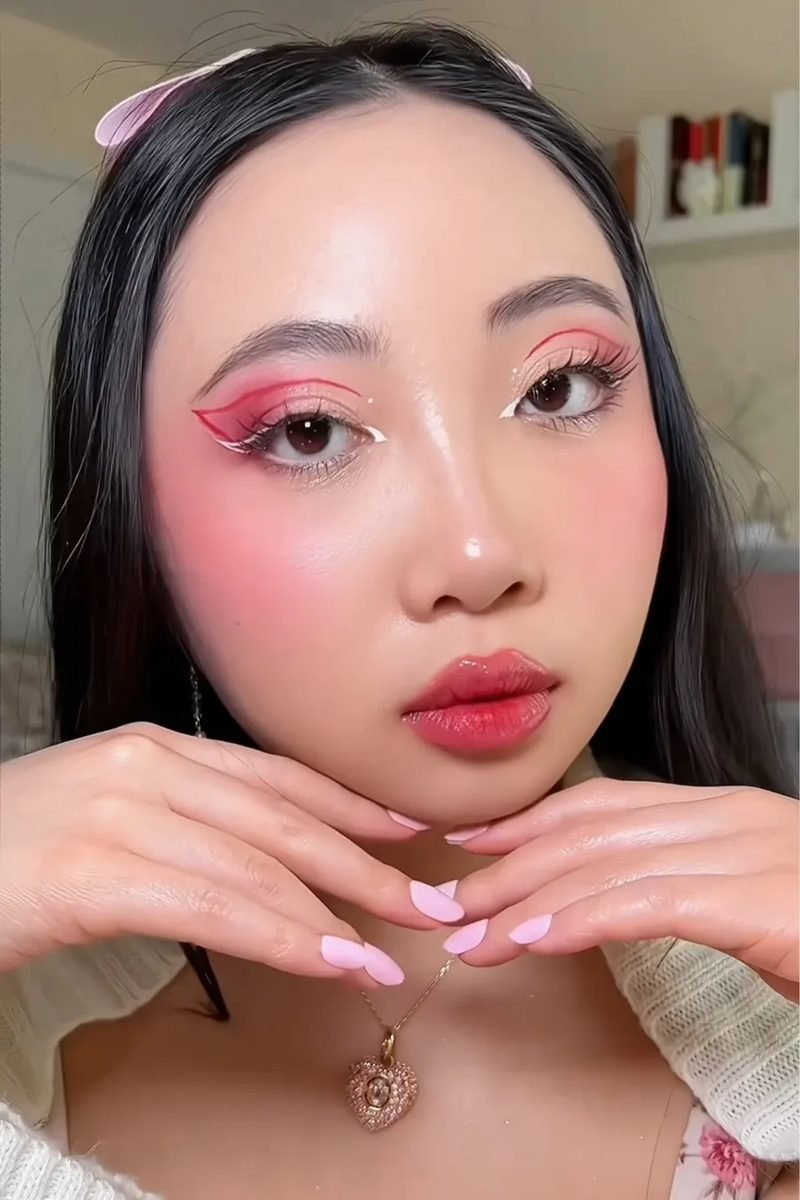
White liner is the sharpest tool in this look. Pink and red graphic shapes sweep over the lids and out at the corners, then a clean white line at the inner corner cuts through the colour and makes the whole design look deliberate and fresh.
Contrast like this works because the white is used sparingly, as an accent rather than a second full liner. The draped pink blush ties the eyes to the rest of the face, and the glossy red pink lip keeps the mood playful. Draw the white last, once the pink shapes are set, so the line stays bright and unmuddied. Small studs or plain hoops suit this look better than long earrings that fight the design.
14. Strawberry Pink Gloss Eye
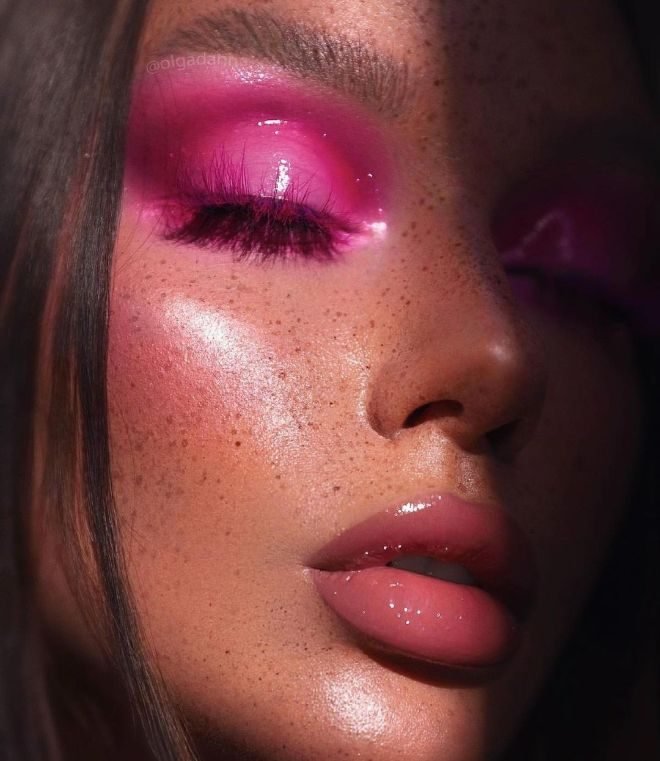
Gloss over shadow changes everything about pink. These lids shine like wet paint, a rich strawberry pink with light sliding across the surface, set against freckled skin and glossy lips that keep the wet theme running. There is no liner to tidy it up, and it does not need any.
Expect gloss to move. It creases, it gathers, and that lived in slide is part of the look rather than a flaw. Apply a matte pink first for colour depth, tap gloss only onto the centre of the lid, and keep the rest of the makeup dewy so the shine looks intentional from every angle. Carry a small gloss pot for touch ups, since the shine fades fastest at the crease.
Lay a matte strawberry pink over the lid so the colour has depth under the shine.
Tap clear gloss or a gloss balm onto the centre of the lid only, keeping it out of the crease.
Match the shine with dewy skin and a glossy lip so the wet finish looks planned.
15. Pink Sunset Blend With Coral
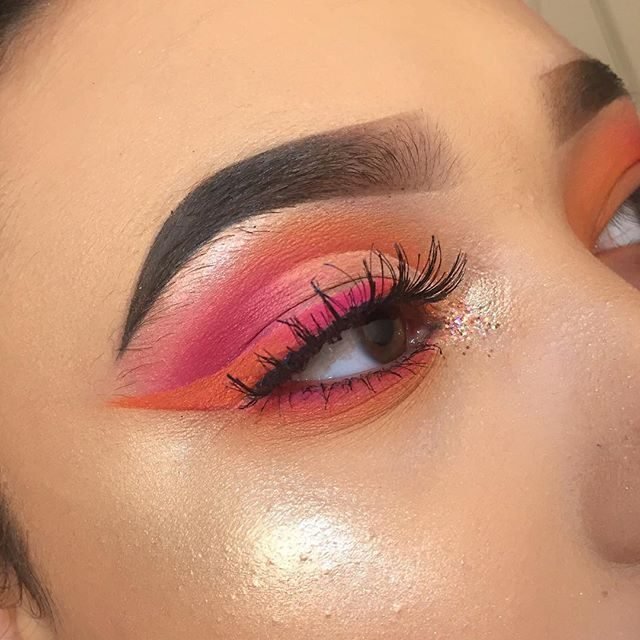
Sunset blends borrow the sky at golden hour. Pink opens at the inner lid, warms into coral through the middle and deepens toward the wing, with a sparkle of glitter dusted at the inner corner like the last of the light. The gradient is smooth enough that no single colour owns the look.
Warm blends fail when the middle colour goes missing and pink jumps straight to orange. Keep a true coral in the centre as the bridge, blend in small back and forth strokes, and let the wing carry the deepest tone. Gold toned skin and a soft highlight on the cheek finish the warm story. This blend flatters warm and olive skin tones especially well.
Coral is the bridge shade. With it in the middle, pink and orange melt into each other instead of clashing at a hard border.
16. Icy Pink Shimmer
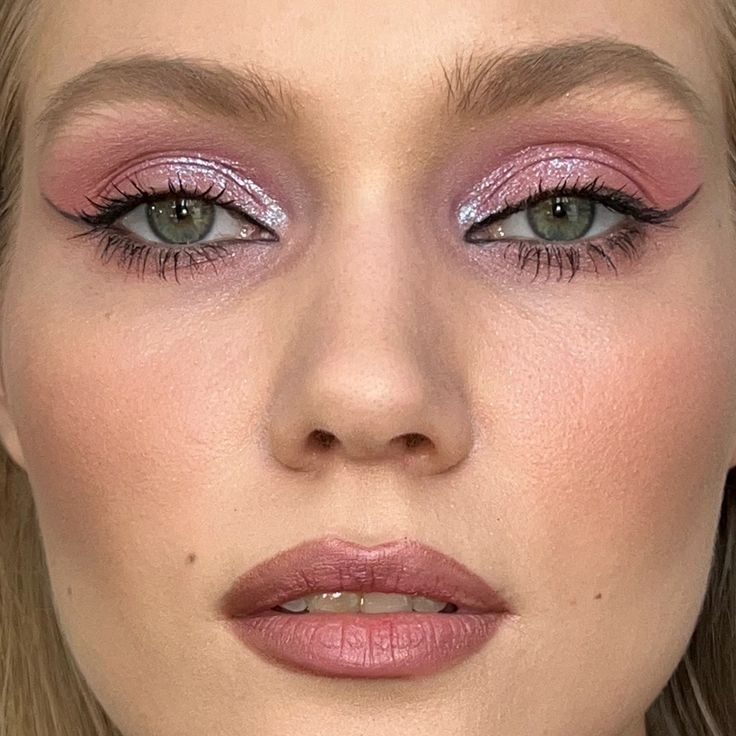
Frost runs through this one. A pale icy pink covers the lids with a silver white shimmer that reads almost metallic in the centre, while the edges stay in a cooler rose. The brows are soft, the lips a muted mauve, and the whole face feels cool toned and polished.
Icy shades can look ashy if the skin around them stays warm and orange, so keep blush and lip colours on the cool side too. A silver or pearl highlight at the inner corner extends the frost, and black mascara gives the pale lid the definition it gives up by being so light. A groomed, softly filled brow frames the frost without warming it up.
Recreate this look
17. Pink Dotted Liner Detail
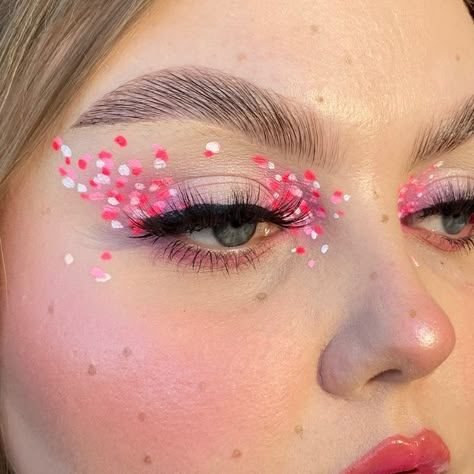
Dots do the decorating here. Over a soft pink lid, tiny dots in pink and white scatter across the outer lid and cluster near the inner corner, like confetti that landed on the eye and stayed. The base makeup stays gentle, which gives the dotted detail room to be the talking point.
Dot work rewards a steady hand and a dotting tool, though the end of a makeup brush handle works in a pinch. Vary the dot sizes, keep them inside the shadow area so the pattern reads as one design, and seal with setting spray rather than powder, which would dull the little white dots. The freckled skin in the photo keeps the dotted design feeling young and playful.
Mix dot sizes and keep the scatter inside the pink shadow area.
Use a dotting tool or brush handle for round, even dots.
Powdering over the dots, which dulls the white ones.
Scattering dots across the whole face, which breaks the design.
18. Mauve Pink Soft Glam
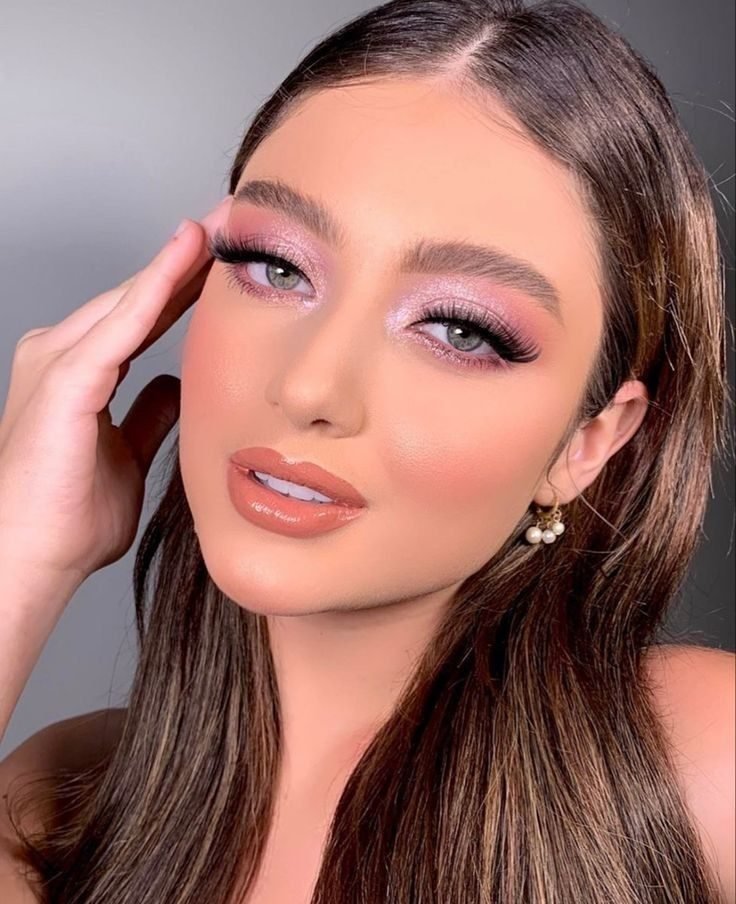
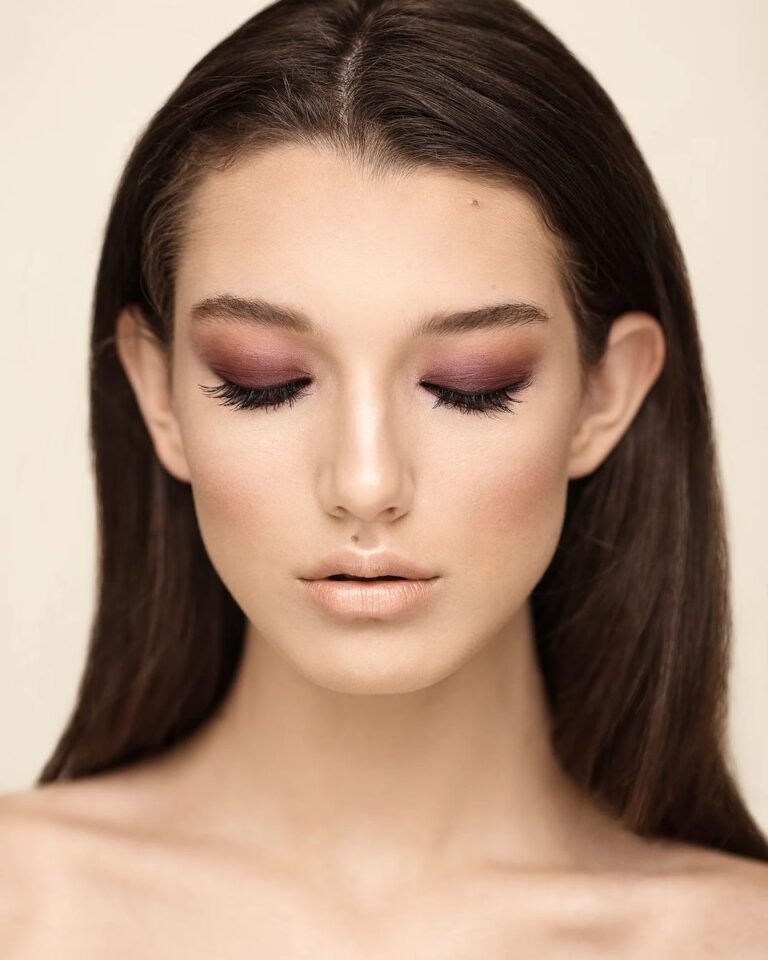
Soft glam takes pink and polishes it. Mauve pink shimmer sits on the lids with a gentle wing, the skin is smooth and lit, blush warms the cheeks in the same rose family, and nude lips keep the finish grown up. Nothing shouts, yet every part of the face has been considered.
This is the pink to choose for weddings, dinners and photos where you want to look like yourself on a very good day. Keep every edge blended, choose shimmer over glitter, and match the blush to the eyeshadow family. The harmony between the tones is what makes it read as glam rather than a collection of parts. It is also the most forgiving pink in this set for anyone new to wearing the colour.
💡 Quick Tip
Pick the blush from the same mauve pink family as the eyeshadow. Matching tones are the quiet secret behind the polished soft glam finish.
19. Pink And Burgundy Depth
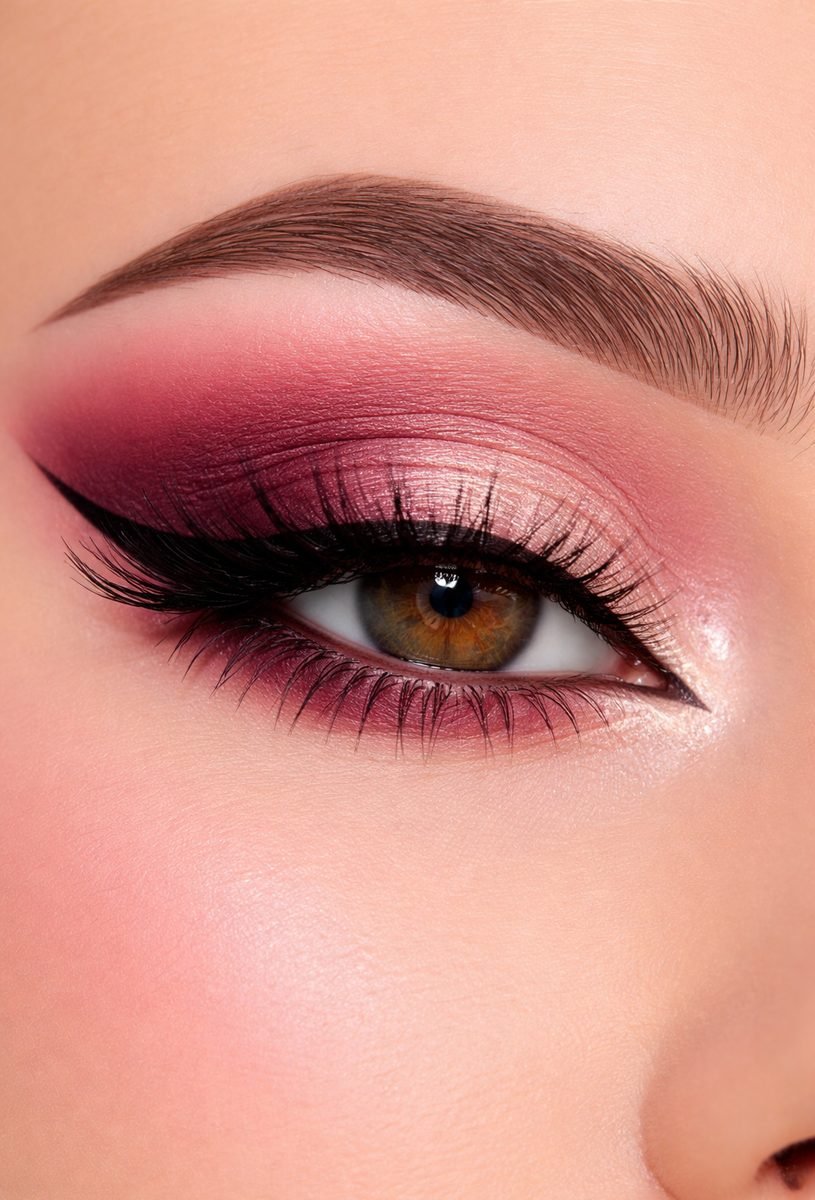
Depth changes pink from sweet to dramatic. A bright pink holds the centre of this lid while burgundy packs into the outer corner and crease, darkening the whole frame, and a sharp black wing cuts through both. The same burgundy smokes under the lower lashes to close the shape.
The balance to watch is the middle of the lid. Keep the bright pink clean and do not let the burgundy creep too far inward, or the eye closes down. Blend the burgundy outward and upward, tap the pink on last with a fingertip, and the contrast that makes this look striking stays intact. A deep berry lip would compete here, so a nude or soft pink lip is the safer partner.
Burgundy blended across the whole lid, swallowing the pink and making the eye look smaller and heavier.
Burgundy held at the outer corner and crease, bright pink kept clean in the centre, like the photo.
20. Baby Pink With Spiky Lashes
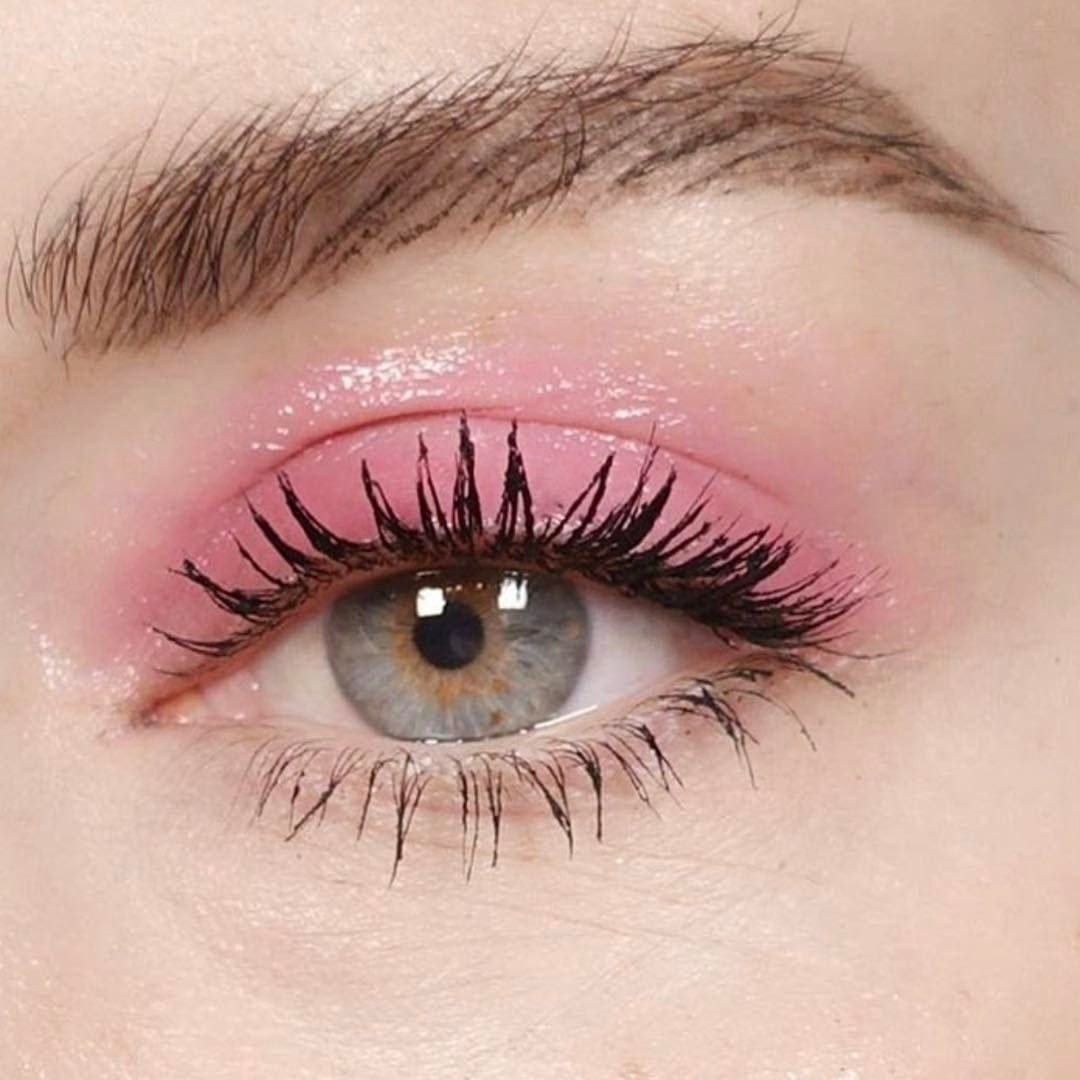
Baby pink gets its edge from the lashes here. The shadow is a pale glossy wash, barely there, while the lashes are separated into fine spikes on both the top and bottom lines, giving the eye a wide awake, doll like frame. The spikes are the detail people zoom in on.
Spiky lashes come from mascara technique more than from the tube. Apply in small sections, pinch a few lashes together at the tips while the mascara is still wet, and keep the lower lashes spiked too so the frame stays even. With lashes this deliberate, the shadow can afford to stay pale and simple. The glossy wash on the lid keeps the pale pink from looking flat.
| Top lashes | Bottom lashes |
|---|---|
| Long spikes, pinched together at the tips | Shorter spikes, spaced evenly along the line |
| Carry most of the drama of the look | Balance the frame so the eye looks open |
21. Neon Pink Accent Corner

A small hit of neon can carry a whole look. The lid here is a soft pink shimmer, pretty but calm, until the inner corner lands: a sharp triangle of neon pink, echoed by a matching neon tip on the wing. Two small flashes of electric colour and the eye looks wide awake.
Accents work best kept tiny and precise. Use a flat brush, place the neon only where you want the flash, and clean the edges so the shape reads as a design choice. If neon at both ends feels like too much, start with the inner corner alone. It brightens the eye in photos more than any other single move.
22. Pink Chrome Finish
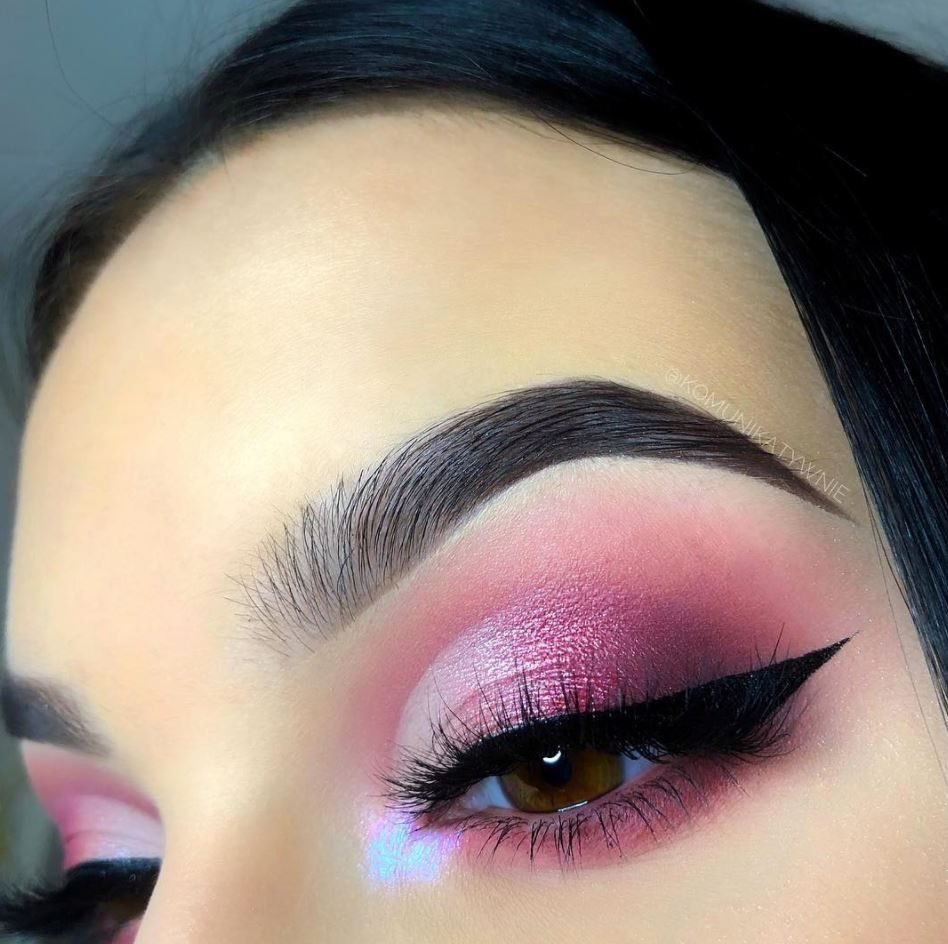
Chrome is foil with the volume up. This lid has a smooth, mirror like pink surface that reflects light in a clean sheet, deepening to plum at the outer corner where a black wing takes over. There is no visible glitter grain, and that smoothness is exactly what separates chrome from ordinary shimmer.
Getting the mirror effect means keeping texture out of the base. Smooth primer, thin layers, and a dense flat brush or fingertip for each pass. Any dry patch underneath shows through as a crack in the reflection. Finish with the wing and mascara, then leave the rest of the face matte so the chrome owns the shine.
- ▸Smooth the lid first. Chrome shows every dry patch under it.
- ▸Build the pink in thin pressed layers until the surface turns reflective.
- ▸Keep the rest of the face matte so the mirror lid keeps the spotlight.
23. The Ultimate Pink Eye Roundup Look
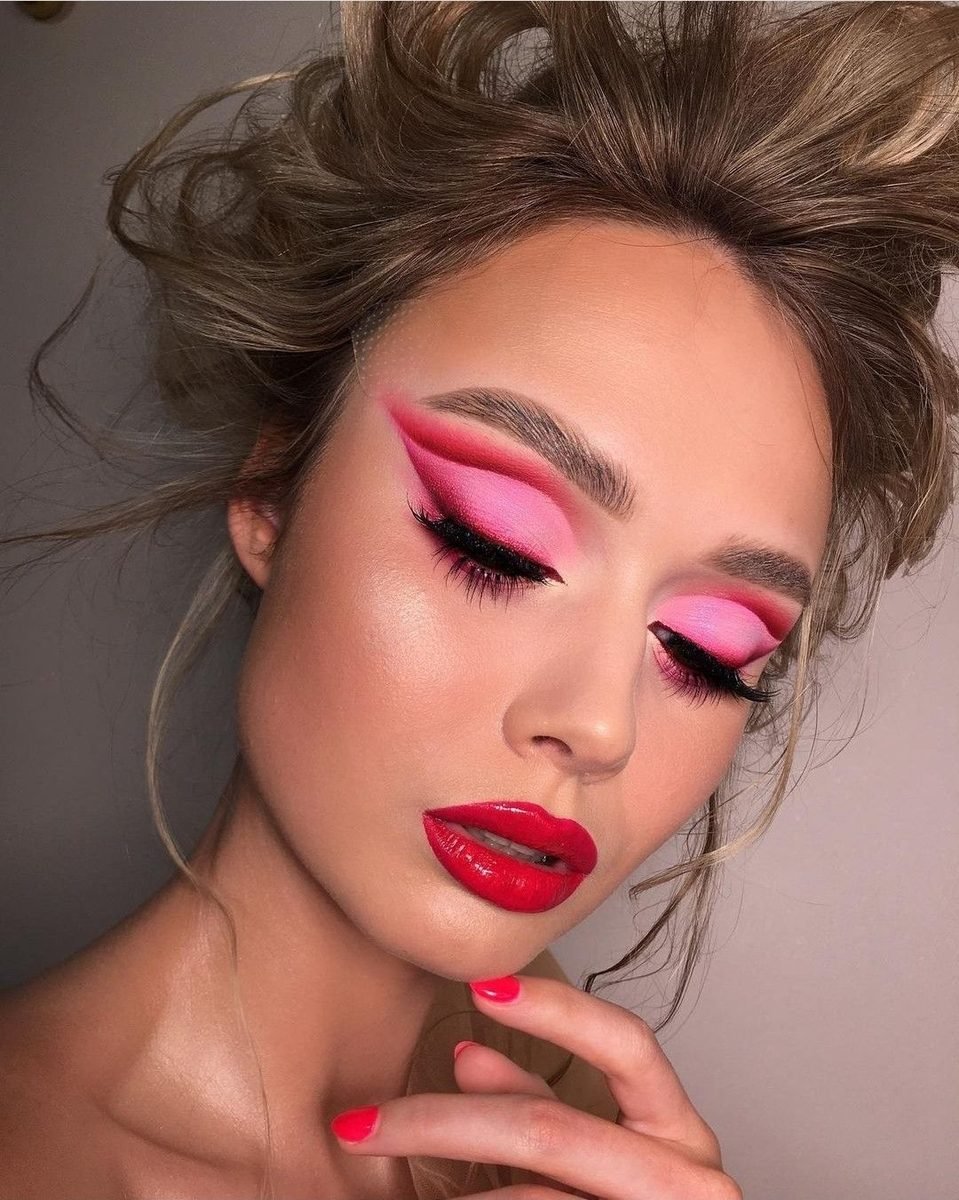
The finale goes all in. Vivid pink lids are carved into an extended graphic shape that sweeps past the outer corners, the skin is bronzed and glowing, and a glossy red lip refuses to play a supporting role. Big styled hair completes a look that was never meant to blend into a crowd.
What keeps it wearable in spirit is the precision. Every edge is placed, the pink is even from corner to corner, and the base makeup is polished enough to hold its own next to the colour. Save this one for the nights when getting ready is half the fun and the photos are guaranteed. Treat it as the full stop at the end of this roundup.
Maximum colour still reads as polished when every edge is deliberate and the skin underneath is flawless.
That is the full set, from the softest watercolour wash to the neon corner flash. The pink eye makeup looks worth saving are the ones that match your mood and your plans, so pick two or three favourites and try the placement on your own eyes before you judge them. Pink rewards a light hand with blending and a brave hand with colour. Save this roundup for the next time you want fresh ideas for a night out, a photo, or a plain Tuesday that needs brightening.