16 Dolly Makeup Mistakes To Avoid That Actually Work
Dolly makeup looks simple from a distance: big eyes, soft blush, glossy lips. Up close, it falls apart in small places. The aegyo-sal never gets drawn, so the eye stays flat. The wing flicks up like a cat eye and the whole mood turns sharp. The blush sits low and drags the face down with it. None of these slips needs a new product or a new skill. Each one is a placement or order problem, and each one has a fix you can see. Most take under a minute once you know where the fix goes. This list walks through sixteen dolly makeup mistakes to avoid, and every entry pairs the mistake with a photo of the corrected version, so you can compare your mirror against the target instead of guessing. Work through the ones that sound familiar. Most faces only need two or three of these fixes, and the change shows up in the very next photo.
1. Mistake: Skipping The Aegyo-Sal Entirely

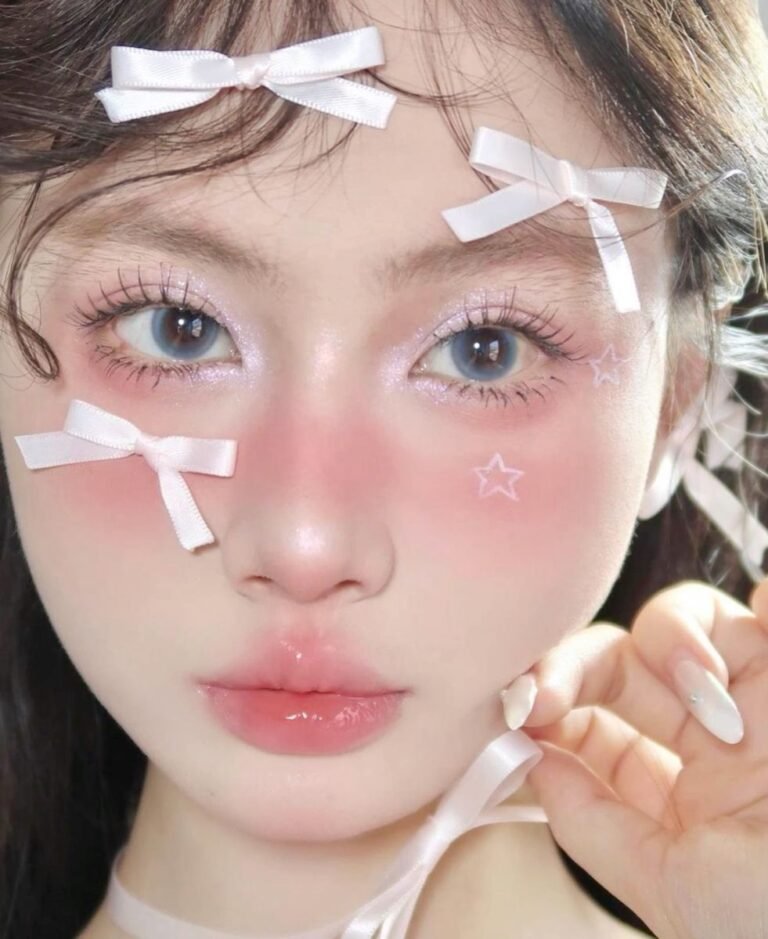
The aegyo-sal is the small puff of skin that sits right under your lower lashes when you smile. Skip it, and even careful shadow and liner leave the eye looking flat and a little tired, because the eye has no lower half. It is the first thing your eye registers in every dolly photo, even if you never knew its name. The whole dolly effect leans on that puff.
- A soft taupe shadow line traced just under the lower lashes, following the eye’s natural curve
- Fine shimmer pressed on the puff itself, so it catches light like real skin
- The line stops before the outer corner, keeping the shape round instead of droopy
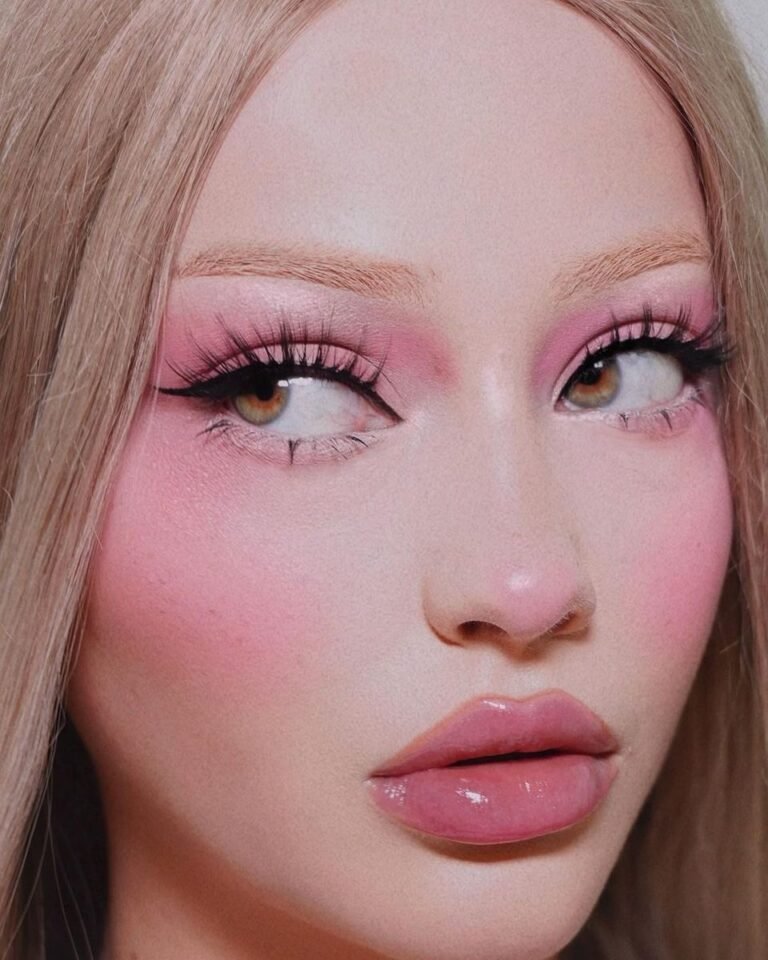
Look at the portrait here: her eyes read big and round before you notice any colour, and that roundness comes from the shaded puff, not from heavier liner.
Trace a soft shadow line under the lower lashes to build the puff.
Press fine shimmer on the puff so it catches the light.
Leaving the under eye bare, flat and unfinished.
Drawing the line too low, where it reads as tiredness.
2. Mistake: Liner Wings Flicked Too High
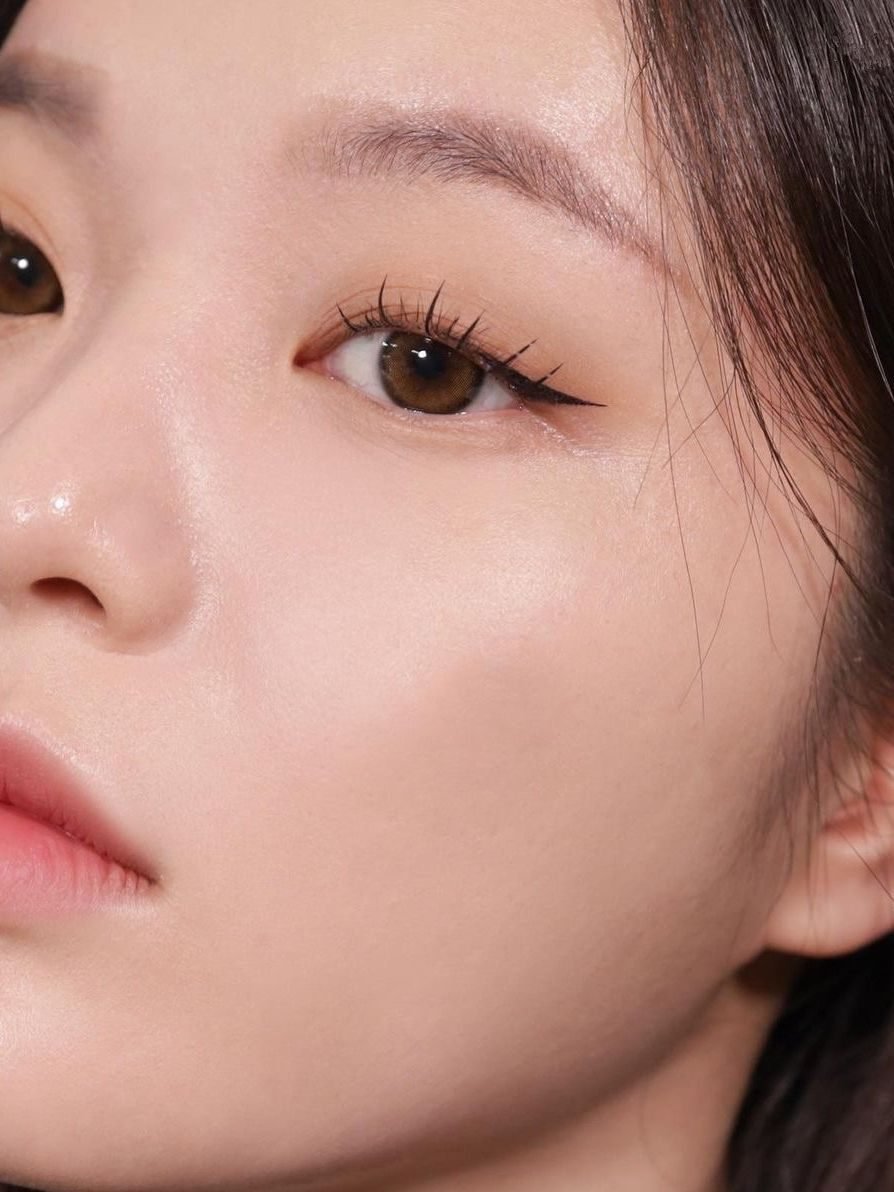
Dolly liner keeps the eye round. A wing flicked high toward the brow does the opposite: it stretches the eye sideways and up, and the soft look turns into a cat eye. The angle is the whole problem, not the liner itself.
In this close-up the tail leaves the outer corner almost flat, level with the lower lash line. It adds length without lift. Brown or black makes no difference here. Direction does. The upper lashes stay spiky and separated, and the lower line stays bare, so the eye keeps its wide, open shape.
Test your own wing in the mirror with your eyes open and looking straight ahead. If the tail points at the end of your brow, it is too high for this style.
Tightline the upper lashes and keep the line thin.
At the outer corner, extend straight out, level with your lower lash line.
Stop after a few millimetres and soften the end with a small brush.
3. Mistake: Blush Placed Too Low On The Cheek

Blush placed low on the cheek pulls the whole face down with it.
Colour that sits under the cheekbone, close to the nose and mouth, reads as tiredness or heat. It shortens the face and fights the wide eyed part of the look. In this portrait the blush starts high, almost under the lower lashes, and sweeps back toward the temple. The centre of the cheek stays lighter, so the face looks lifted and the eyes stay the focus. Notice how the edge melts out with no visible border. Low blush tends to sit in a round patch. High blush is a wash that fades.
Place your first tap where your lower lashes end, then blend up and out. Down is the direction to avoid.
4. Mistake: Lashes So Heavy They Close The Eye

A thick, heavy lash strip works against everything this style wants. The weight pushes the lid down, the eye looks half closed in photos, and the black band swallows the soft shadow under it.
The lashes in this close-up are the opposite build: thin at the base, separated into fine spikes, with real gaps of skin showing between them. The eye underneath stays fully visible and round. Length lives at the centre of the lash line, which opens the eye upward instead of dragging it sideways.
If a strip feels heavy on your own eye before glue even dries, it will photograph heavy too. Cut a strip into thirds and place only the centre and outer pieces for a lighter frame.
💡 Quick Tip
Judge a lash strip by its band, not its length. A thin, clear band with separated fibres keeps the eye open. A thick black band closes it, no matter how pretty the curl looks in the box.
5. Mistake: Foundation Two Shades Too Pale
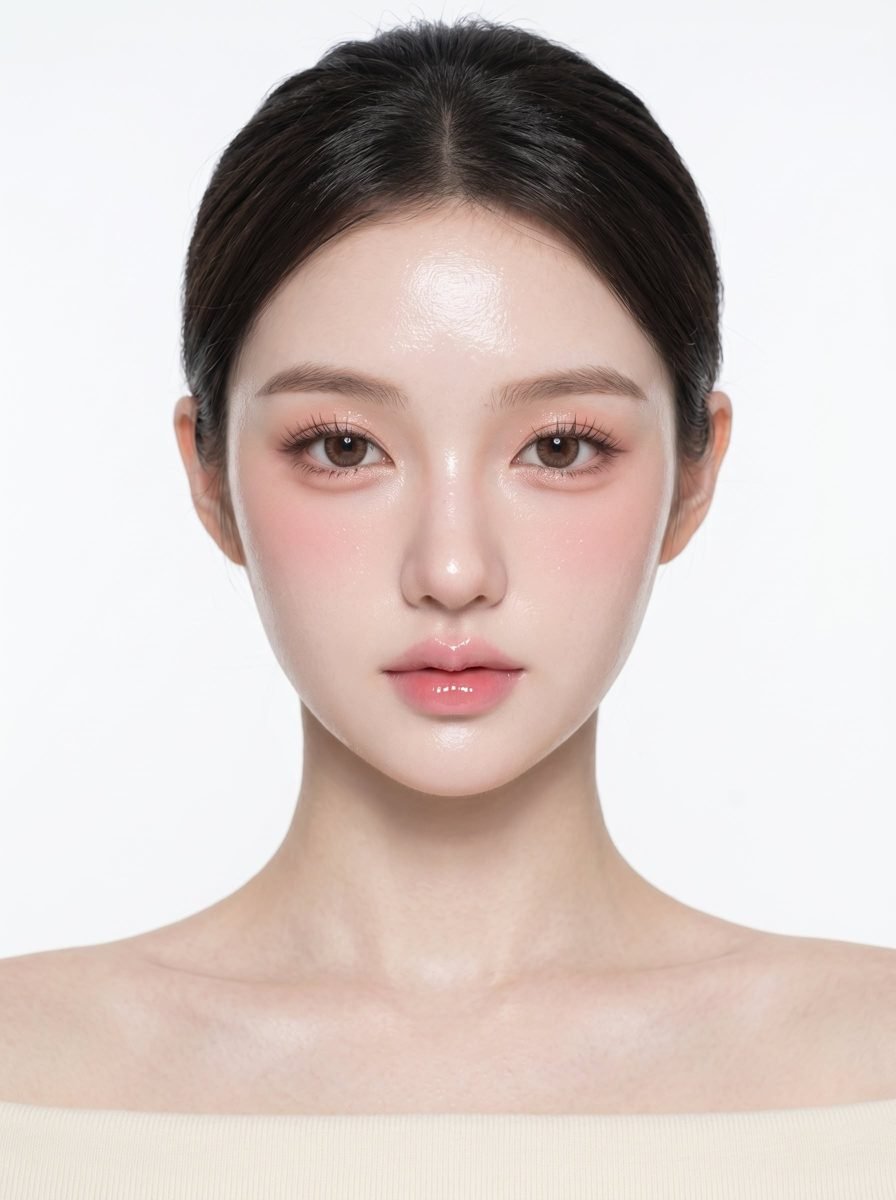
A base two shades too pale does not read as bright. It reads as a mask. The face floats in front of the neck, flash photos turn grey, and every soft colour placed on top loses its warmth.
Study the skin in this studio portrait. Face, neck and chest run in one unbroken tone, and the jaw has no edge where the makeup stops. Her blush and lip colour sit inside that tone instead of fighting it. That match is what lets a pale pink blush stay gentle rather than chalky.
- Test shades along the jaw, not the wrist, and let them dry for five minutes
- Check the match at a window. Bathroom light hides a pale cast
- Blend the last bit down onto the neck so no border survives
6. Mistake: Harsh Dark Brows Against Soft Eyes
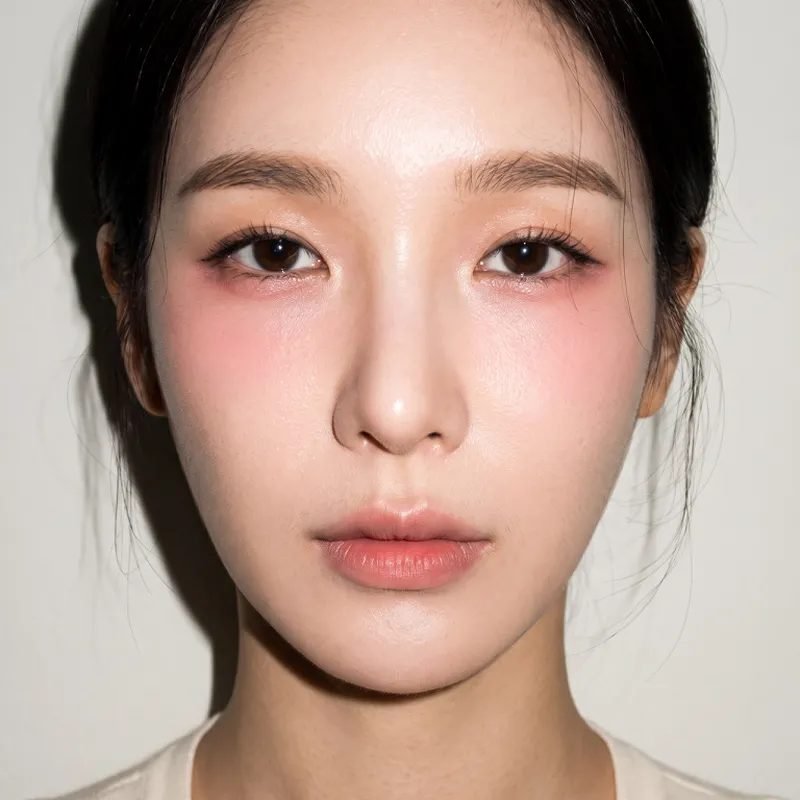
Dark, solid brows over soft eyes create a tug of war. The brows arrive first in every photo, and the pale shadow and aegyo-sal underneath them look washed out by comparison.
Hers are built from fine strokes in a taupe brown, darker only through the middle, with the front of the brow left light and feathery. The shape is straight and calm. Nothing about them shouts, so the pink under her eyes and the soft lash line get to do the talking. If your natural brows are dark, a tinted brow mascara one shade lighter breaks the hardness without changing the shape.
Fill less than feels right, then step back from the mirror. Brows read stronger at arm’s length than they do up close.
Soften the brow
7. Mistake: Matte Dry Lips With A Glossy Eye

Gloss is half the dolly formula. When the eyes shine and the lips stay flat and dry, the face splits into two different makeup styles, and the dry lip pulls focus because it catches no light at all.
In this portrait the shine is shared. Her lids carry a fine shimmer, her cheeks carry a dewy highlight, and her lips are wet looking rose, glossy enough to reflect the same light. Even the colour family agrees: rose at the eye, rose at the cheek, rose at the mouth. A matte lip you love can stay in rotation for other looks. For this one, gloss or a glossy tint is what finishes the picture.
Dry patches show through gloss, so smooth the lips first and let any balm sink in before colour.
Shine shared across eyes, cheeks and lips reads as one look. Shine in only one place reads as two looks fighting.
8. Mistake: Glitter Fallout Left Under The Eyes
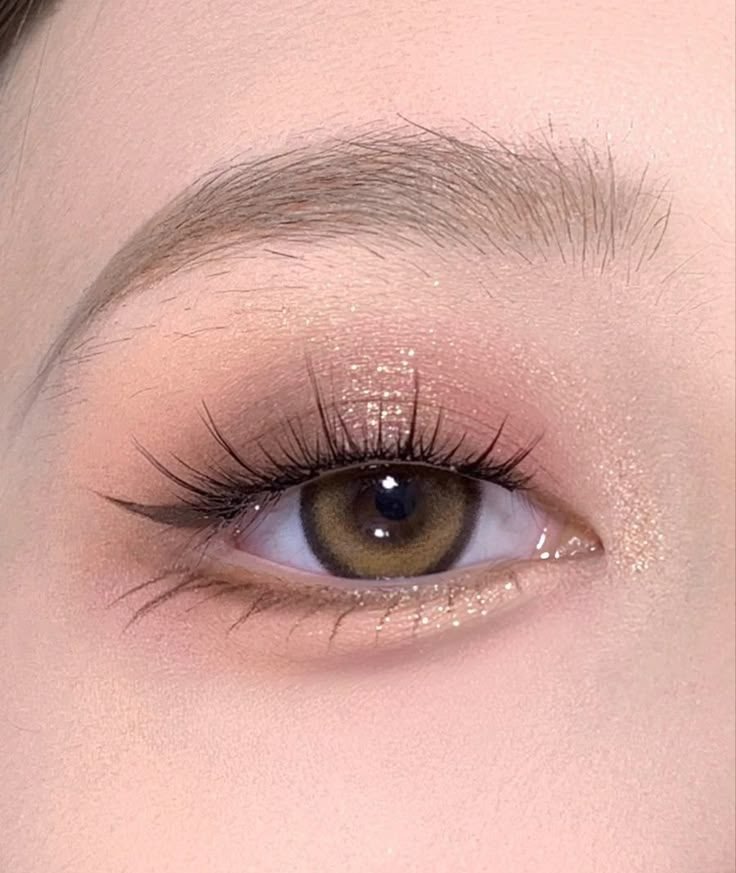
Glitter travels. Specks that land under the eye during application settle into the aegyo-sal shadow and sit on the cheek for hours, reading as dirt in daylight and as tiredness in photos.
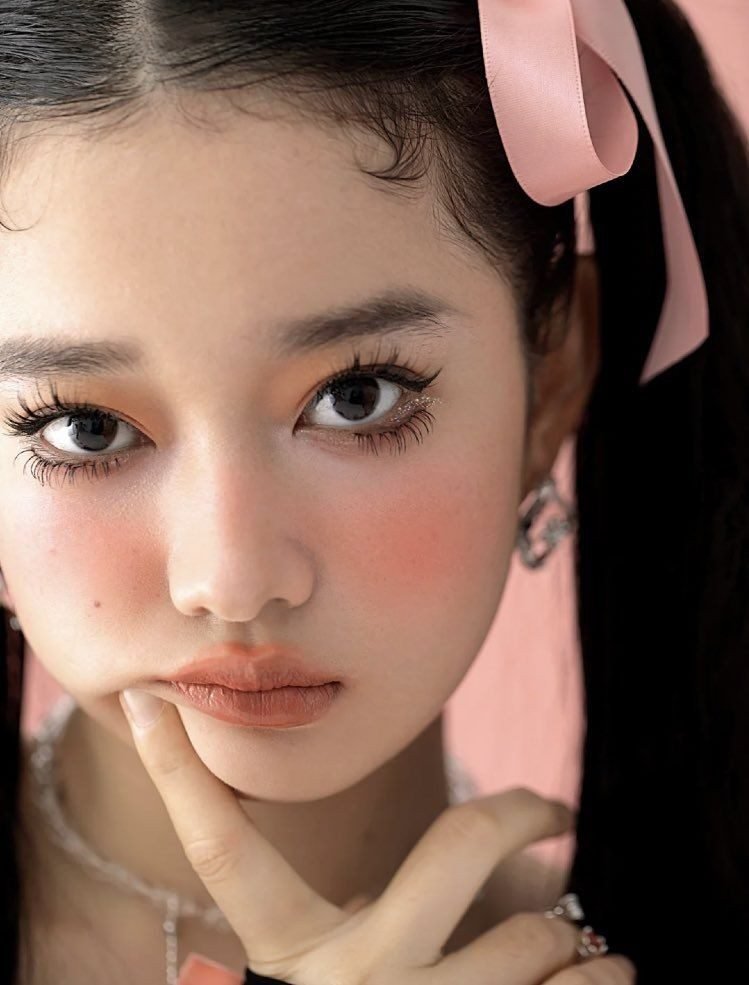
The eye in this photo shows the target state: fine champagne glitter packed across the lid and along the puff, and the skin below it completely bare. That clean border is not luck, and it is not a filter. It comes from order, plus a minute spent lifting strays before they settle. Glitter goes on before foundation, loose specks get lifted with a small piece of tape, and only then does the base go down, so there is nothing for fallout to stick to.
Do the glitter eye first, before any foundation.
Hold a tissue under the eye while you pack the glitter on.
Lift stray specks with tape, then apply base and build the aegyo-sal.
9. Mistake: Skipping Lower Lashes Completely
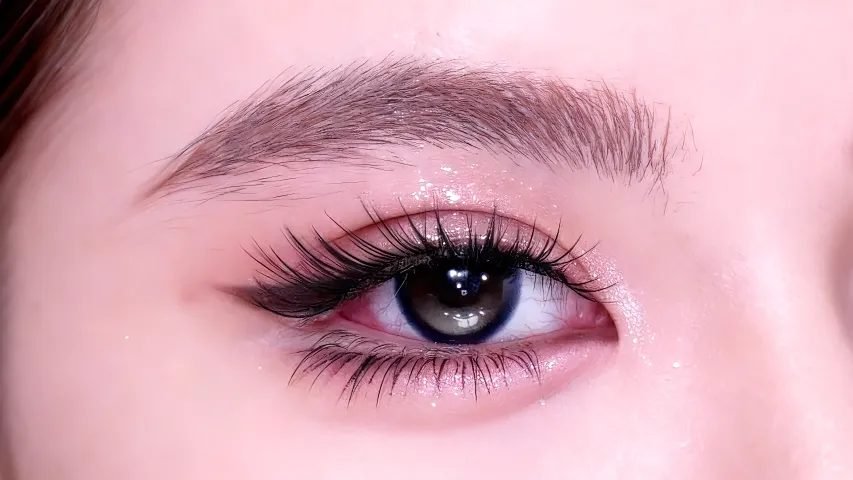
Bare lower lashes leave the eye half framed. The top lashes get longer and darker, the bottom stays empty, and the eye tips upward visually, losing the round shape the style depends on.
In this macro the lower lashes are fine, separated and clearly there, echoing the spikes above at half the length. The aegyo-sal shimmer sits just under them. Together they close the frame around the eye, and the eye reads bigger from across the room. Mascara on a small brush, or a few cluster lashes pressed between your own, both get you here. Work with the eye open and looking up, so the brush meets the lashes without touching skin. One coat is plenty. The lower line should whisper, not shout.
Top lashes long and dark, lower line bare. The eye tips upward and the round shape is lost.
Fine lower lashes at half the length of the top set. The frame closes and the eye reads round and bigger.
10. Mistake: Blush And Lip Colours Fighting Each Other

A coral blush with a blue pink lip, or a peach cheek with a berry mouth: each colour is pretty alone, and together they argue. Your eye keeps jumping between the two and the softness of the look breaks.
This profile is the fix in one frame. Shadow, blush and lip all live in the same pink family, close enough in depth that the face reads as one wash of colour. Nothing competes. The glossy finish repeats too, which ties the three zones together even more. The easiest way to copy it is to use one product twice: tap your lip tint onto the cheeks and blend, then build the lip properly.
| Fighting pair | One family |
|---|---|
| Coral blush beside a blue pink lip | Pink blush beside a pink gloss of the same depth |
| Peach cheek with a berry mouth | One tint used on both cheeks and lips |
| Each colour pretty, together they argue | The face reads as one wash of colour |
11. Mistake: Overdone Contour Killing The Softness
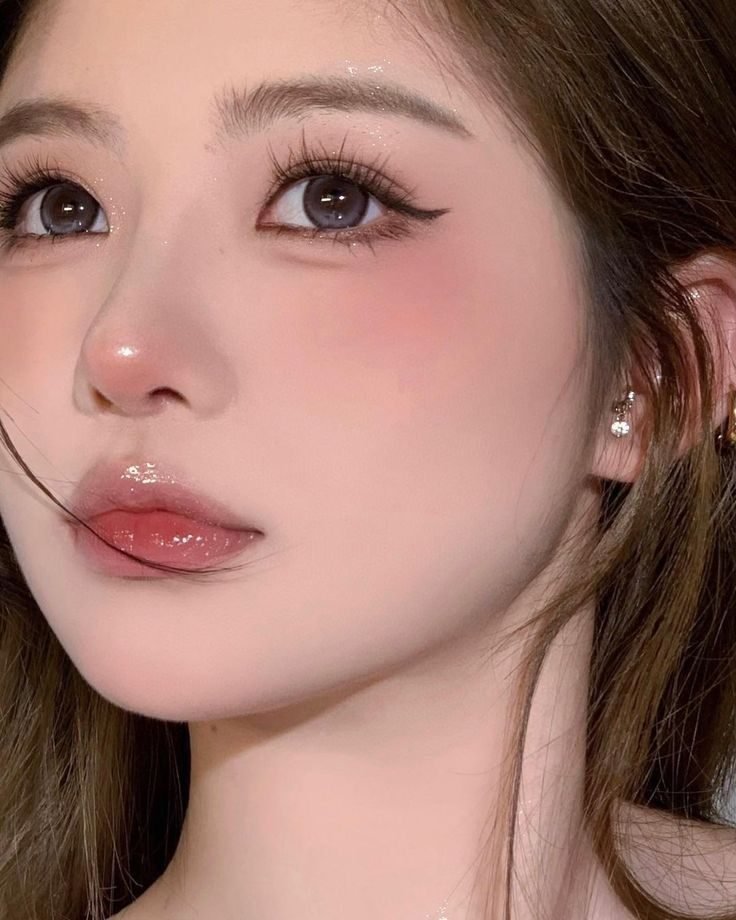
Contour built for camera flash and cheekbone drama has no place here. Grey brown stripes under the cheek and down the nose harden a face that this style wants round, young and soft.
Look at how this face is shaped instead. There is no visible stripe anywhere. A soft blush high on the cheek does the lifting, a whisper of shading sits only where the jaw already shadows, and the centre of the face stays bright and plump. The roundness is the point. Blush is the contour of this style. It just works upward instead of carving inward. If you contour, switch to a cream product two shades deeper than your skin at most, and blend until a friend cannot find the edge.
Let high blush do the lifting.
Keep any shading cream, warm, and two shades deep at most.
Grey stripes under the cheekbone.
A dark line down the sides of the nose.
12. Mistake: White Eyeliner Drawn Too Thick On The Waterline
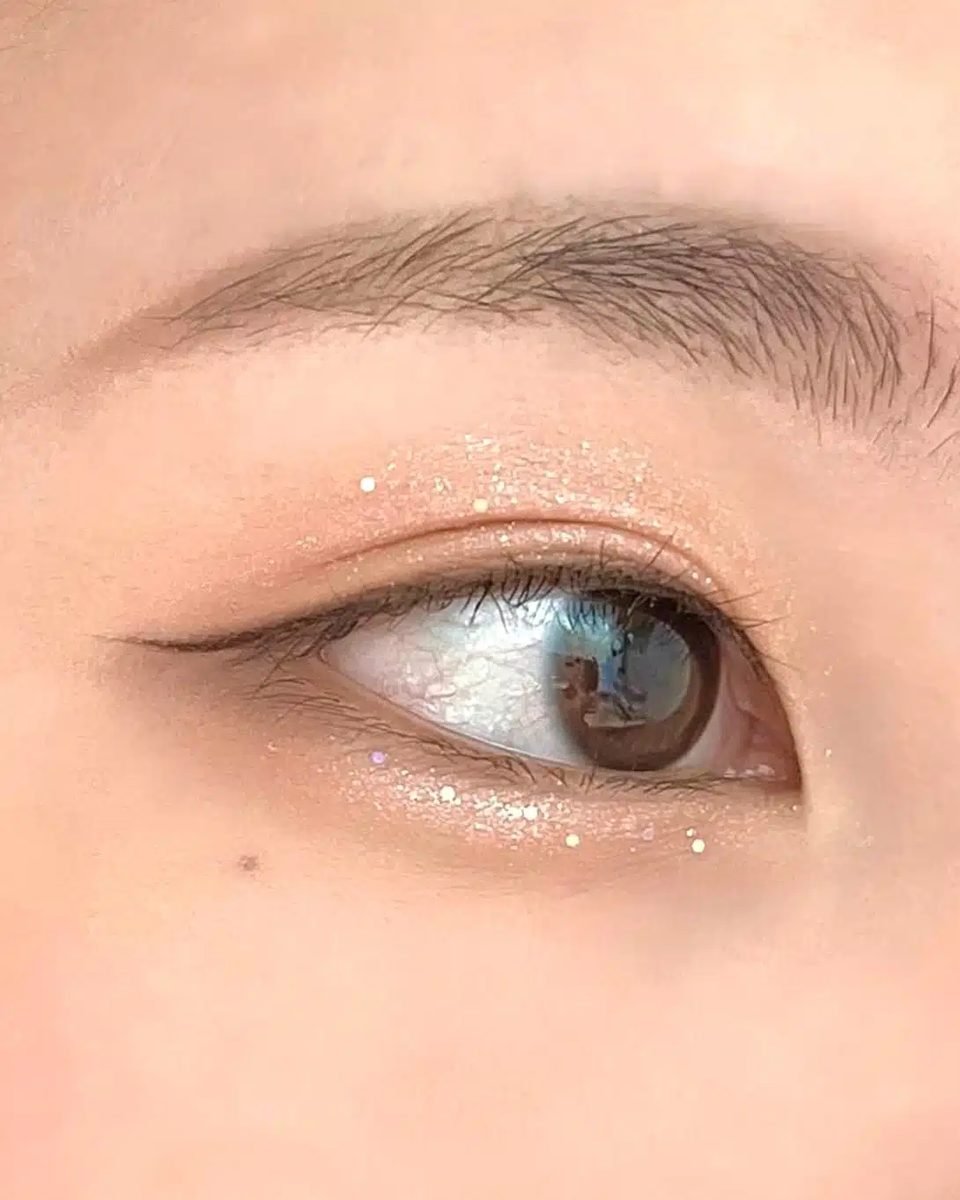
A thick white line on the waterline was meant to make eyes look bigger. Up close it does the reverse: the eye reads as a ring, the white looks chalky against real skin, and the line breaks into the lashes within the hour.
The brightness in this profile comes from somewhere smarter. A fine shimmer sits on the aegyo-sal, just under the lower lashes, and the waterline itself stays bare and natural. The eye looks awake because the light sits on skin, where light belongs, not on the wet line of the eye. If you keep a nude pencil, keep it thin, skin toned, and only through the centre third.
⚠️ Watch Out
White pencil on the waterline turns chalky fast and can make eyes water. Keep brightness on the aegyo-sal skin instead, and if you use a nude pencil, keep it thin and skin toned.
13. Mistake: Powder Settling Into A Cakey Base

Powder is where this base goes wrong. A heavy dusting settles into the fine lines under the eyes and around the nose, and by midday the face looks dry, flat and older than the makeup promised.
The skin in this close-up still looks like skin. Texture is visible, the under eye is smooth rather than packed, and the glow sits on the surface instead of under a matte crust. That comes from thin layers: base pressed on in small amounts, powder only where shine breaks through first, usually the sides of the nose and the centre of the forehead. The aegyo-sal zone gets no powder at all, so it stays plump.
14. Mistake: Puppy Liner Dragged Too Far Down
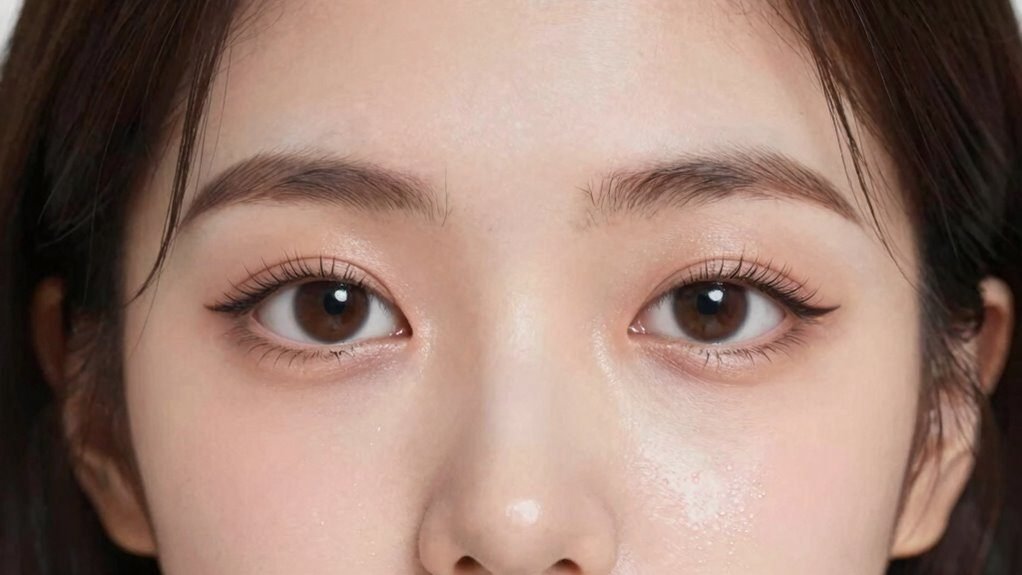
Puppy liner has a built in limit. The tail follows the top lid downward to soften the eye, but dragged too far it pulls the whole eye down with it, and the face reads sad or sleepy instead of gentle. It is a matter of millimetres, and they matter.
- In this portrait the tails stop almost as soon as they start, a short slope past the outer corner
- Both eyes keep their round shape, with the aegyo-sal doing most of the softening work
- The lower lashes stay light, so the small tail never has to compete
Measure yours against your lower lash line. The tail should end before it passes the lowest point of the eye.
- ▸The tail should slope down gently, following the top lid
- ▸Short is the rule: a few millimetres past the corner
- ▸Stop before the tail passes the lowest point of the eye
15. Mistake: Highlight Placed Where It Enlarges Pores
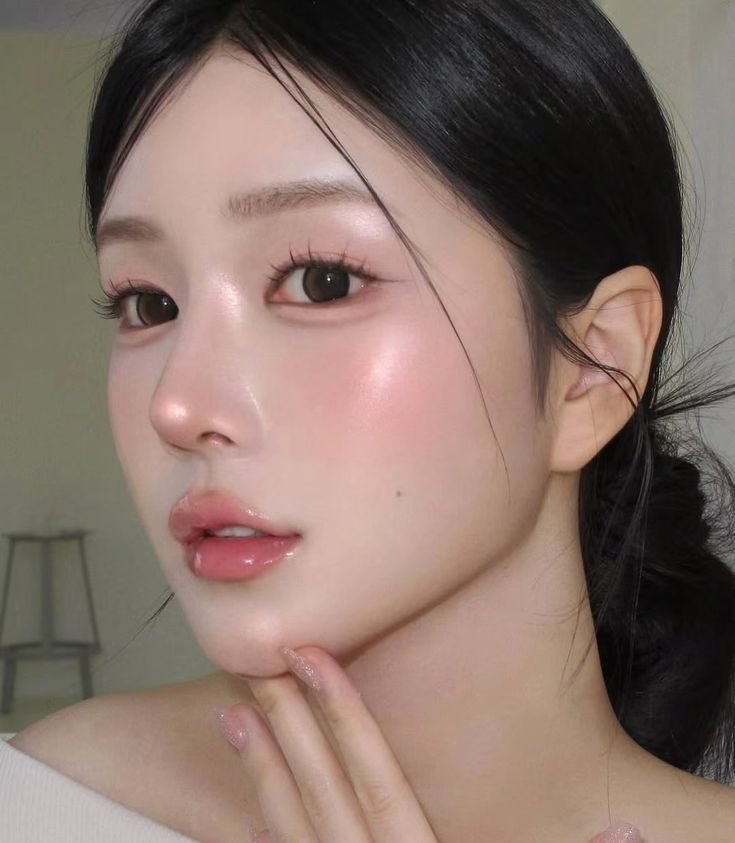
Highlight has a geography. Placed across the centre of the cheek, where pores are at their largest, shimmer acts like a magnifier: every pore catches its own sparkle and the skin texture doubles in size.
In this portrait the shine is rationed. It sits on top of the cheekbone, where the bone is close to the skin, and in a fine line down the nose. The middle of the cheek, where her blush lives, stays satin and calm. Same product, completely different result, decided only by placement. Matte blush plus targeted highlight will always look smoother than shimmer spread everywhere. Pores are largest beside the nose and across the cheek centre, which is exactly where restraint pays.
16. Mistake: Copying A Look That Ignores Your Eye Shape
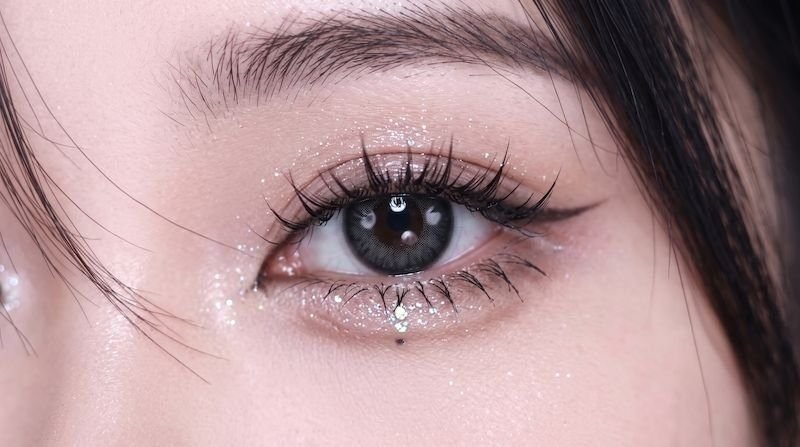
Every tutorial is filmed on one person’s eyes. Copy the placement exactly on a different eye shape and the liner vanishes into a fold, the wing lands in the wrong place, and the look seems broken when it was only misplaced.
This monolid eye shows the adapted version. The liner is drawn as a floating line that stays visible with the eye open, the lashes are curled hard so they clear the lid, and the aegyo-sal is built lower and softer to give the eye its roundness. Same dolly idea, different map. Start from your own eye shape, borrow the colours and finishes from any look you love, and redraw the placement on your own lid.
Redraw the map
Sixteen fixes, and not one of them asks for a shopping trip. Dolly makeup rewards small, quiet corrections: a puff shaded under the lower lashes, a wing kept low, blush lifted, gloss where the light already lands. Pick the two dolly makeup mistakes to avoid that match your own mirror first, practise those on a slow morning, and let the rest wait. Work through them in any order. Save this list for the next time a look feels almost right and you cannot name why.